Apple-Shaped Back-to-School Cake Pops
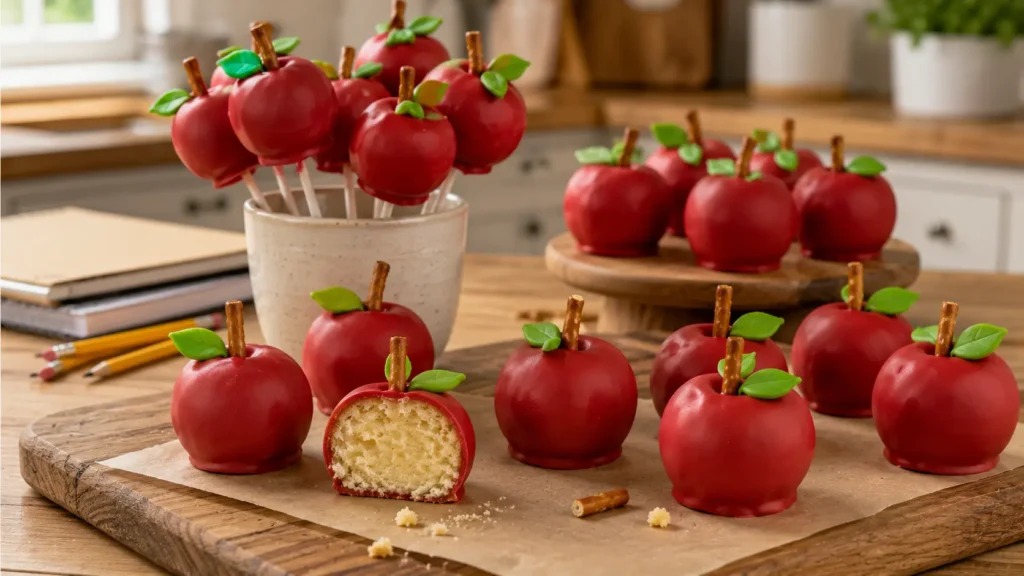
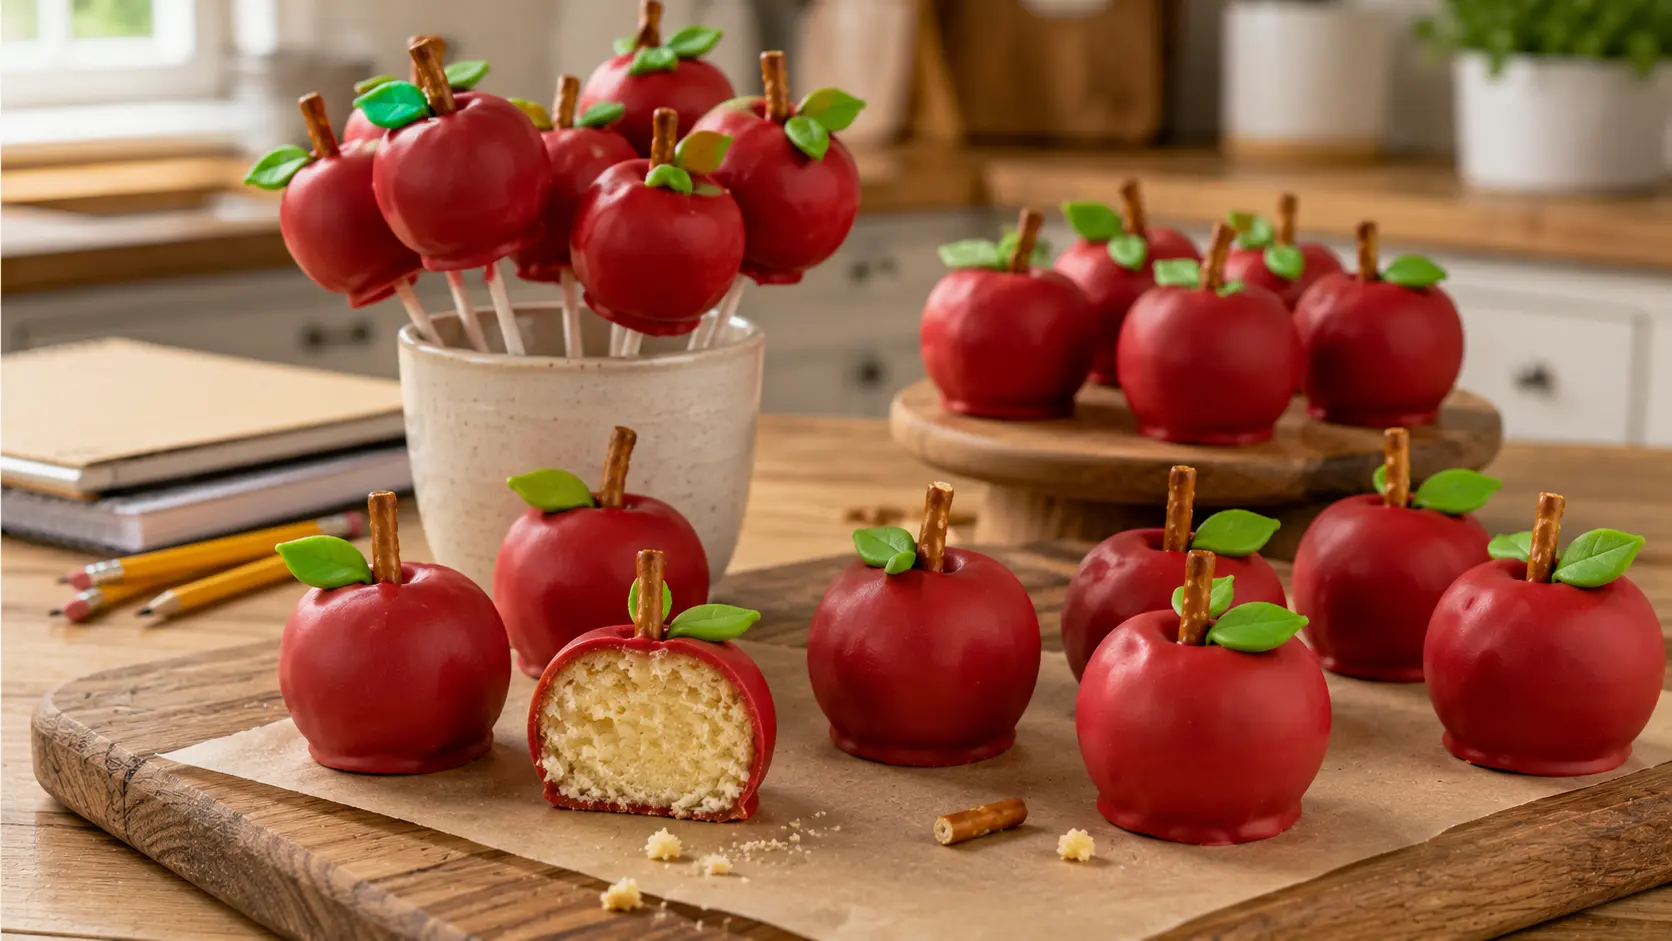
Back-to-school season is the perfect excuse to make something playful, colorful, and easy to share, and these Apple-Shaped Back-to-School Cake Pops are made for the occasion. Each bite combines soft cake and creamy frosting inside a smooth red candy coating, then gets finished with a tiny pretzel stem and green candy leaf to create an adorable little apple.
They’re especially fun for the first week of school, teacher appreciation treats, classroom parties, lunchbox surprises, or a back-to-school dessert table. The apple design looks impressive, but the decorating technique is simple enough to recreate at home without complicated cake-decorating equipment.
Best of all, cake pops are an excellent make-ahead dessert. You can prepare the cake centers in advance, chill them thoroughly, and decorate them when you’re ready to serve.
Easy Apple-Shaped Back-to-School Cake Pops
These apple cake pops start with a baked vanilla cake that is crumbled and mixed with just enough vanilla frosting to hold everything together. The cake mixture is then shaped into slightly rounded apple forms rather than perfectly smooth balls.
After chilling, each cake pop is dipped into melted red candy coating. A small pretzel piece becomes the stem, while green candy melts or small fondant leaves create the classic apple appearance.
The key is resisting the temptation to use too much frosting. Cake pops should be moist enough to hold together while still tasting like cake rather than soft frosting.
The slightly imperfect apple shapes are actually part of their charm. Real apples aren’t perfectly round, and keeping each cake pop a little different gives the finished batch a much more homemade appearance.
⭐ Why You’ll Love This Recipe
- Perfect for back-to-school season: The little red apples instantly fit a classroom or teacher theme.
- Kid-friendly: Sweet vanilla cake and candy coating make them approachable for children.
- Make-ahead friendly: The cake centers can be prepared and chilled in advance.
- Fun party dessert: Individual portions are easy to display and serve.
- Customizable: Change the cake flavor, leaf color, or decorations while keeping the apple theme.
- No advanced decorating skills required: The recognizable apple shape comes together with a few simple details.
🛒 Ingredients
Vanilla Cake
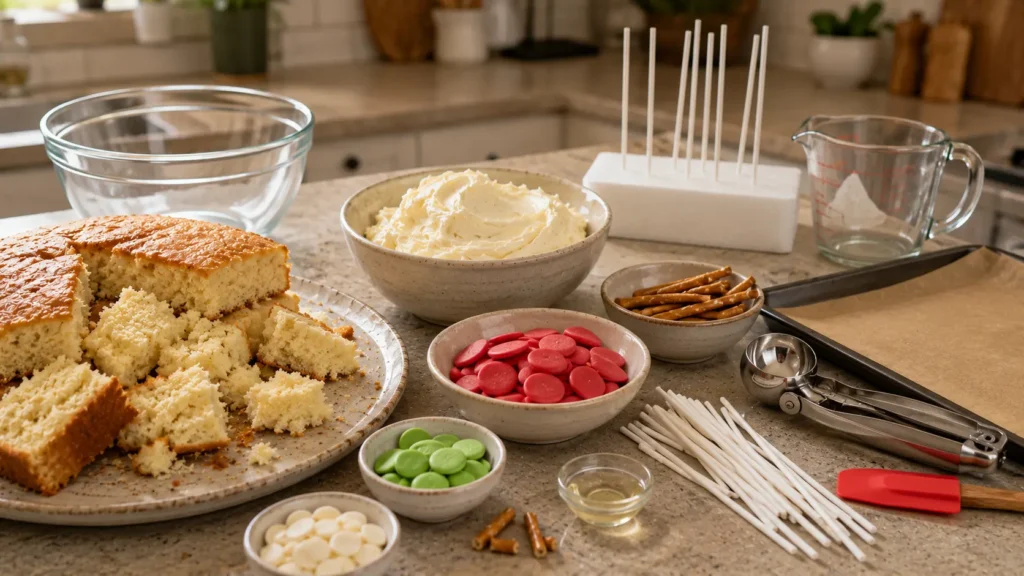
Use one baked 9 × 13-inch vanilla cake, completely cooled.
A boxed vanilla cake mix works perfectly well, or you can use your favorite homemade vanilla cake recipe.
The cake must be completely cool before crumbling. Warm cake mixed with frosting can become overly sticky and dense.
Vanilla Frosting
Use approximately ½ cup vanilla frosting, adding it gradually.
You may not need the entire amount depending on how moist your cake is.
The frosting acts as the binder that helps the cake crumbs hold their shape.
Red Candy Melts
You’ll need approximately 20 ounces red candy melts or red confectionery coating.
Candy coating is easier to work with than regular melted chocolate because it sets firmly without tempering.
Choose an unbranded bright or deep apple-red coating depending on the look you prefer.
Cake Pop Sticks
Use approximately 24 cake pop sticks.
Standard 6-inch sticks work well and are easy to arrange upright for parties.
Pretzel Sticks
Small pieces of pretzel sticks create realistic-looking apple stems.
Break each pretzel into pieces around ½–¾ inch long.
The pieces don’t need to be identical.
Green Candy Melts
Use a small amount of green candy melts to create tiny leaves.
You can pipe or shape small green leaf accents after the red coating has set.
Neutral Oil or Candy-Melt Thinner
About 1–2 teaspoons neutral oil or candy-melt thinning aid, if needed.
This is optional but useful if the melted coating is too thick for smooth dipping.
Optional White Candy Melts
A small amount of white candy coating can be used for optional decorative details.
For a simpler and cleaner apple design, you can leave them plain red with only stems and leaves.
Sprinkles
Small back-to-school-themed sprinkles are optional.
Use them sparingly so the cake pops still clearly resemble apples.
👩🍳 How to Make Apple-Shaped Back-to-School Cake Pops
1. Bake the cake
Prepare the vanilla cake according to your chosen recipe or cake-mix directions.
Bake in a 9 × 13-inch pan until a toothpick inserted in the center comes out clean.
2. Cool completely
Allow the cake to cool completely before making the cake pop filling.
Do not crumble warm cake.
3. Remove firm edges if necessary
If the cake has particularly browned or firm edges, trim away some of the driest pieces.
This helps produce a smoother cake-pop interior.
4. Crumble the cake
Break the cake into large pieces and place them in a large mixing bowl.
Use clean fingertips or a fork to crumble the cake until it resembles fine, fluffy crumbs.
Avoid compressing the crumbs too much.
5. Add frosting gradually
Start with approximately ¼ cup vanilla frosting.
Mix it into the crumbs.
Continue adding frosting about one tablespoon at a time until the mixture holds together when squeezed.
You may use anywhere from ⅓ to ½ cup, depending on the cake.
6. Test the texture
Take a small handful and squeeze it together.
It should hold its shape without cracking apart, but it should not feel wet, greasy, or excessively sticky.
7. Portion the mixture
Scoop approximately 1½ tablespoons of cake mixture for each cake pop.
Try to keep the portions similar in size without making them perfectly identical.
8. Shape into apples
Roll each portion gently into a ball.
Then slightly flatten the top and bottom.
Use your fingertips to create a very subtle indentation at the top where the apple stem will eventually sit.
Don’t make perfect spheres.
9. Arrange on a tray
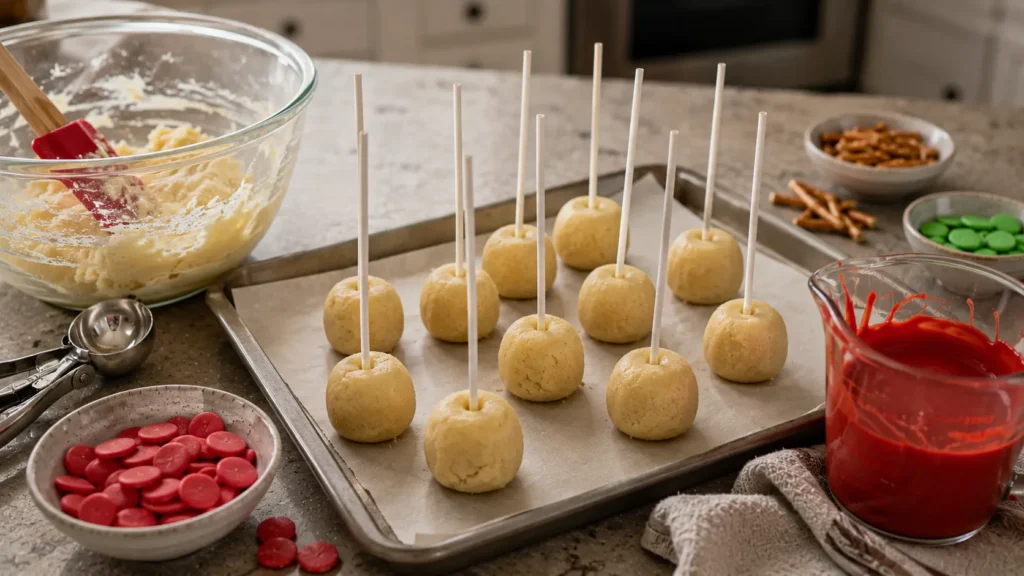
Place the shaped cake balls on a parchment-lined baking sheet or tray.
Leave a small amount of space between them.
10. Chill
Refrigerate the shaped cake pops for approximately 1 hour, or until firm.
You can also freeze them for about 15 minutes, but don’t freeze them solid.
11. Melt a small amount of red coating
Melt approximately ½ cup red candy melts according to package instructions.
Stir until smooth.
12. Secure the cake pop sticks
Dip approximately ½ inch of one end of each cake pop stick into the melted red coating.
Immediately insert the coated end about halfway into the bottom of a chilled cake ball.
Repeat with the remaining cake pops.
13. Chill again
Place the pops back onto the tray and refrigerate for approximately 10–15 minutes.
This helps secure the sticks.
14. Melt the remaining red candy coating
Place the remaining red candy melts in a deep microwave-safe bowl or measuring cup.
Melt in short intervals, stirring frequently until completely smooth.
If the coating seems unusually thick, mix in a very small amount of neutral oil or candy-melt thinning aid.
15. Dip each cake pop
Hold one chilled cake pop by the stick and lower it vertically into the melted red coating.
Submerge it completely.
Lift it straight out rather than swirling aggressively.
16. Remove excess coating
Gently tap the wrist holding the cake pop while rotating the stick slowly.
Allow excess coating to drip naturally back into the bowl.
Do not bang the cake pop against the bowl.
17. Add the pretzel stem
Before the coating completely sets, insert a short pretzel piece into the indentation at the top of the apple.
Press gently.
18. Allow the coating to set
Place each dipped cake pop upright in a cake-pop stand, foam block, or sturdy container filled with uncooked rice.
Allow the coating to harden completely.
19. Make the green leaves
Melt a small amount of green candy coating.
Transfer it to a small piping bag or zip-top bag and snip off a tiny corner.
Pipe a small leaf next to each pretzel stem.
Alternatively, pipe leaves onto parchment first, allow them to set, and attach them with a tiny dot of melted coating.
20. Finish and serve
Allow all decorations to harden before transferring the cake pops to a serving platter or storage container.
Serve at cool room temperature.
✨ Variations
Chocolate Apple Cake Pops
Use chocolate cake instead of vanilla cake for a richer interior while keeping the classic red exterior.
Red Velvet Apple Cake Pops
Red velvet cake creates an especially fun surprise when someone bites into the red apple coating.
Caramel Apple Cake Pops
Drizzle a small amount of caramel-colored candy coating across the finished red cake pops.
Keep the drizzle light so they still resemble apples.
Green Apple Cake Pops
Use green candy coating instead of red for a Granny Smith-inspired version.
Mini Apple Cake Pops
Make slightly smaller cake balls using about one tablespoon of mixture each.
Smaller pops are great for younger children or large parties.
Teacher Appreciation Cake Pops
Arrange the finished apples in a small gift box or decorative cup for a teacher-themed gift.
🔥 Tips for the Best Apple-Shaped Back-to-School Cake Pops
Don’t use too much frosting. This is the most common cake-pop mistake. Too much frosting produces a mushy, overly sweet center.
Chill before dipping. Firm cake balls are much easier to coat without falling off the sticks.
Don’t freeze solid. Extremely cold cake pops dipped into warm candy coating are more likely to crack as the temperatures equalize.
Use a deep container for dipping. A narrow measuring cup makes it easier to fully cover the cake pop without using an excessive amount of coating.
Thin the coating carefully. Add thinning oil only in very small amounts.
Keep the apples slightly imperfect. Small differences in shape make the finished pops look handmade and realistic.
Insert the stick halfway. Pushing the stick too far can crack the top of the cake ball.
Decorate while the coating is still slightly tacky. This makes it easier to secure the pretzel stem.
🥡 Storage & Freezing
Room Temperature
Finished cake pops can stay at cool room temperature for several hours when serving at a party.
Avoid leaving them somewhere warm or in direct sunlight because the coating can soften.
Refrigerator
Store cake pops in an airtight container in the refrigerator for up to 5 days.
Allow them to sit at room temperature for about 15–20 minutes before serving for the best texture.
Freezing Undipped Cake Pops
The shaped cake centers can be frozen before coating.
Arrange them on a tray until firm, then transfer them to a freezer-safe container.
Freeze for up to 1 month.
Thaw them gradually in the refrigerator before dipping.
Freezing Finished Cake Pops
Finished cake pops can technically be frozen, but condensation may affect the candy coating when they thaw.
For the nicest appearance, freeze the uncoated centers instead.
❓ Apple-Shaped Back-to-School Cake Pops FAQs
Can I use boxed cake mix for cake pops?
Yes. A boxed vanilla cake mix works very well and makes this recipe quicker.
How much frosting should I add?
Start with about ¼ cup and add more gradually. The exact amount depends on the moisture level of your cake.
Why are my cake pops falling off the sticks?
This can happen if the cake mixture is too soft, the balls are too large, or the sticks weren’t secured with melted candy coating first.
Why did my candy coating crack?
Cake pops that are extremely cold can expand slightly after dipping and crack the coating. Chill them until firm, but avoid dipping completely frozen cake balls.
Can I use regular chocolate instead of candy melts?
Yes, but regular chocolate may need proper tempering to produce a firm, shiny coating. Candy melts are generally easier for cake pops.
How far in advance can I make these?
You can make the cake centers several days ahead and finish decorating the cake pops one or two days before serving.
What can I use instead of pretzels for the stems?
Small pieces of chocolate candy, modeling chocolate, or brown candy coating can work.
Can I make these without cake pop sticks?
Yes. Turn them into apple-shaped cake truffles by placing the coated cake balls directly onto parchment paper.
How do I keep the coating smooth?
Make sure the candy coating is completely melted and fluid enough to dip. Use a small amount of candy-melt thinner if necessary.
Are these good for a school party?
Yes, although you should always check the school’s food and allergy policies before bringing homemade treats.
Apple-Shaped Back-to-School Cake Pops
Ingredients
Method
- Bake the vanilla cake in a 9 x 13-inch pan according to your recipe or package directions. Cool completely.
- Trim away any particularly firm or dry cake edges if necessary.
- Crumble the cooled cake into a large mixing bowl until fine crumbs form.
- Add about 1/4 cup vanilla frosting and mix thoroughly.
- Continue adding frosting 1 tablespoon at a time until the cake mixture holds together when squeezed. Avoid making the mixture overly wet.
- Portion about 1 1/2 tablespoons of cake mixture for each cake pop.
- Roll each portion gently into a ball, then slightly flatten the top and bottom to create an apple-like shape.
- Make a small indentation in the top of each cake ball for the future stem.
- Arrange the cake balls on a parchment-lined tray.
- Refrigerate for approximately 1 hour, or until firm.
- Melt about 1/2 cup of the red candy coating until smooth.
- Dip approximately 1/2 inch of one end of each cake pop stick into the melted coating.
- Insert the coated end of each stick halfway into one chilled cake ball.
- Refrigerate for another 10–15 minutes.
- Melt the remaining red candy coating in a deep microwave-safe container, stirring frequently until smooth.
- If necessary, add a very small amount of neutral oil or candy-melt thinner until the coating reaches a smooth dipping consistency.
- Dip each cake pop vertically into the red coating until completely covered.
- Lift straight out and gently tap your wrist while slowly rotating the pop to allow excess coating to fall away.
- Before the coating completely sets, insert a short pretzel piece into the indentation at the top to create the apple stem.
- Place the cake pop upright in a cake-pop stand or foam block and allow the coating to set.
- Melt the green candy coating and transfer it to a small piping bag.
- Pipe one small green leaf beside each pretzel stem.
- Add optional decorations or sprinkles sparingly if desired.
- Allow all decorations to set completely before serving or storing.