Easy Halloween Fruit Platter – 5 Spooky Fruit Ideas
Halloween treats don’t have to mean an entire table covered in candy. This easy Halloween fruit platter turns everyday bananas, clementines, apples, grapes, and strawberries into five playful spooky treats that kids will actually be excited to grab.
The best part is that none of the ideas require complicated carving or professional decorating skills. You’ll make adorable banana ghosts, clementine pumpkins, monster apple mouths, grape caterpillars, and white chocolate strawberry ghosts, then arrange everything together on one big Halloween platter. Most of the work is simple enough that kids can help, too.
Serve it at a Halloween party, after-school celebration, family movie night, or alongside sweeter treats like our Graveyard Dirt Cups and Monster Cookies. It’s colorful, easy to customize, and gives your Halloween table something fresh between all those brownies, cookies, and candy.
Easy Halloween Fruit Platter for Kids
A Halloween fruit platter is basically a regular fruit tray transformed into something much more fun with a few simple decorating tricks.
And we’re not just throwing orange and green fruit onto a tray and calling it Halloween.
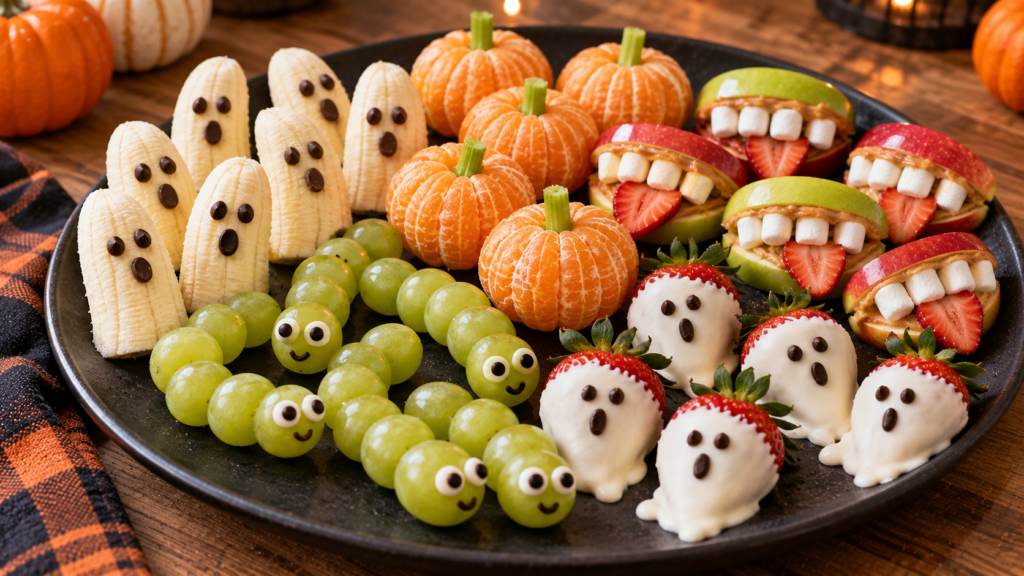
This platter includes five individual Halloween fruit ideas, each with its own character:
- Banana ghosts
- Clementine pumpkins
- Monster apple mouths
- Grape caterpillars
- Strawberry ghosts
Together, they give you different colors, shapes, flavors, and textures without requiring dozens of ingredients.
It’s also a useful option when your Halloween menu already contains plenty of rich desserts. Our Perfect Candy Corn Sugar Cookie Bars and Mummy Brownies, for example, are great party treats, but adding fresh fruit gives guests something lighter to grab between the sweeter desserts.
Why You’ll Love This Halloween Fruit Platter
Five ideas on one tray. Instead of making one type of Halloween fruit, you get five different designs.
Easy enough for beginners. No elaborate fruit carving is required.
Fun for kids. Familiar fruits become ghosts, pumpkins, monsters, and caterpillars.
Perfect for Halloween parties. One large platter can become the centerpiece of a snack table.
Mostly fresh fruit. Chocolate, marshmallows, and peanut butter are used mainly for decoration and flavor.
Easy to customize. You can make more of whichever fruit your family likes best.
Great for making with children. Kids can help add chocolate-chip faces, pumpkin stems, marshmallow teeth, and other decorations while an adult handles cutting.
Naturally colorful. Orange clementines, green grapes, red apples, strawberries, and pale bananas create plenty of Halloween color without needing to dye everything.
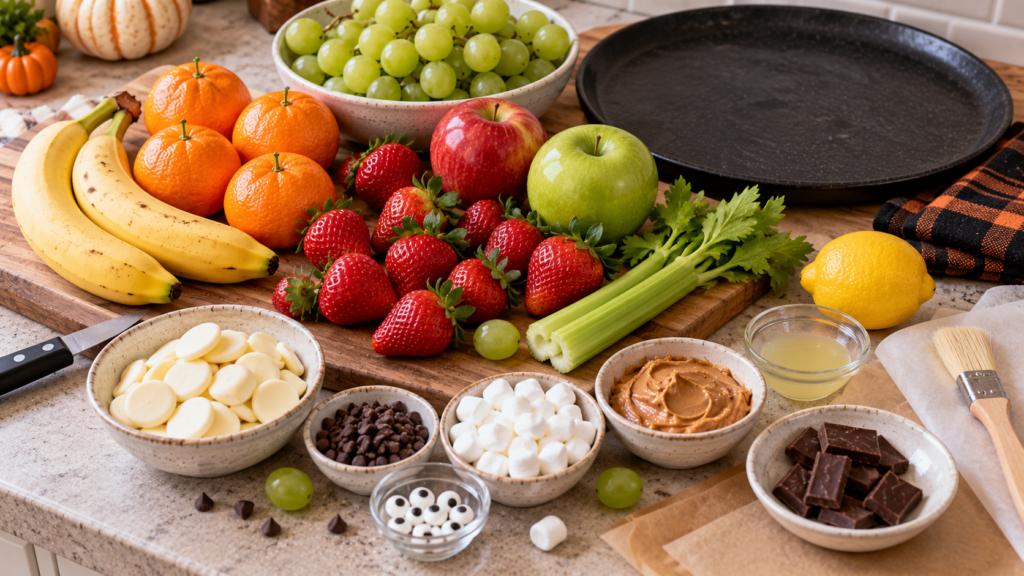
Ingredients You’ll Need
Bananas
Choose bananas that are ripe but still relatively firm.
Very ripe bananas are softer, more difficult to handle, and more likely to become mushy on the platter.
We’ll cut them into pieces and turn them into little ghosts.
Mini Chocolate Chips
Mini chocolate chips create the eyes and mouths for our banana ghosts.
Their small size works much better than full-sized chocolate chips.
We’ll also use melted chocolate for the strawberry ghost faces.
Clementines
Once peeled, clementines already have the round, segmented appearance of tiny pumpkins.
That’s why they’re one of the easiest Halloween fruit ideas you can make.
Celery
Small, thin pieces of celery become stems for the clementine pumpkins.
You only need a very small amount.
Apples
Firm, crisp apples work best for monster mouths.
Red or green apples both work, and using some of each gives the platter more color.
Peanut Butter
Peanut butter acts like the “glue” inside the apple monster mouths while also adding a creamy contrast to the crisp apples.
If you’re serving anyone with a peanut allergy, use an appropriate nut-free spread instead.
Mini Marshmallows
Mini marshmallows become the silly monster teeth between the apple slices.
You can leave them whole or cut some in half for different-sized teeth.
Strawberries
Thin strawberry slices create bright red monster tongues.
Whole strawberries are also used to make our white chocolate ghosts.
Green Grapes
Choose firm, seedless green grapes for the caterpillars.
Wash and dry them thoroughly before assembling.
Candy Eyes
Small edible candy eyes make the grape caterpillars immediately recognizable and add a playful Halloween expression.
They’re optional—you can use tiny dots of melted chocolate instead.
White Chocolate
White chocolate coats the strawberries and transforms them into little ghosts.
Melting wafers are especially convenient, although good-quality white chocolate works too.
Lemon Juice
A little lemon juice helps slow down browning on the cut bananas and apples.
You don’t need to soak the fruit. A very light coating is enough.
How to Make a Halloween Fruit Platter
The easiest way to build this platter is to prepare each of the five fruit designs separately and then assemble everything on one large tray.
1. Wash and Dry the Fruit
Wash the apples, grapes, strawberries, and celery thoroughly.
Dry everything very well.
This is particularly important for the strawberries because water can interfere with melted white chocolate.
2. Prepare Your Serving Platter
Choose a large flat serving platter, board, or tray.
Make sure it’s completely clean and dry.
Don’t arrange anything yet. We’ll prepare all five Halloween fruits first.
Idea 1: Banana Ghosts 👻
3. Cut the Bananas
Peel the bananas and cut each one in half crosswise.
Stand the pieces upright with the cut side resting on the platter.
The naturally curved top creates a surprisingly good little ghost shape.
4. Add the Ghost Faces
Press two mini chocolate chips into each banana for eyes.
Add another mini chocolate chip below them for the mouth.
For slightly different expressions, turn some chocolate chips in different directions.
5. Help Prevent Browning
Very lightly brush exposed banana surfaces with lemon juice.
Don’t soak them, or you’ll noticeably change the flavor.
Set the banana ghosts aside while you prepare the other fruit.
Idea 2: Clementine Pumpkins 🎃
6. Peel the Clementines
Carefully peel each clementine while keeping the fruit intact.
Remove excessive white pith, but don’t pull the segments apart.
7. Make the Pumpkin Stems
Cut celery into small, thin pieces approximately ½–¾ inch long.
Insert one celery piece gently into the opening at the top of each peeled clementine.
That’s it—you’ve got miniature fruit pumpkins.
Idea 3: Monster Apple Mouths 👹
8. Slice the Apples
Cut each apple into wedges.
You’ll need two wedges for each monster mouth.
Remove seeds and any tough core pieces.
Lightly brush the cut surfaces with lemon juice to slow browning.
9. Add Peanut Butter
Spread peanut butter onto one cut side of each apple wedge.
Use enough to hold the marshmallows in place but not so much that everything slides apart.
10. Make the Teeth
Press several mini marshmallows along one peanut-butter-covered apple wedge.
Don’t make them perfectly straight.
Crooked teeth actually make the monsters look better.
11. Add a Strawberry Tongue
Place a thin strawberry slice toward the front so it extends slightly beyond the apple.
12. Finish the Monster Mouth
Place another peanut-butter-coated apple wedge on top.
Press very gently until everything stays together.
The marshmallows should remain visible between the two apple wedges like teeth.
Idea 4: Grape Caterpillars 🐛
13. Arrange the Grapes
Place approximately 6–8 green grapes in a curved line for each caterpillar.
You can assemble them on short food-safe skewers for older children and adults, but for a kid-focused platter, arranging them directly on the tray avoids sharp skewers.
14. Make the Faces
Choose a slightly larger grape for the head.
Attach two small edible candy eyes with tiny dots of melted chocolate.
Alternatively, use tiny dots of melted chocolate directly for the eyes.
Give each caterpillar a slightly different curve so they don’t look identical.
Idea 5: Strawberry Ghosts 👻🍓
15. Melt the White Chocolate
Place the white chocolate in a microwave-safe bowl.
Microwave for about 20 seconds at a time, stirring after each interval.
Stop as soon as it becomes smooth.
Avoid overheating white chocolate because it can seize surprisingly quickly.
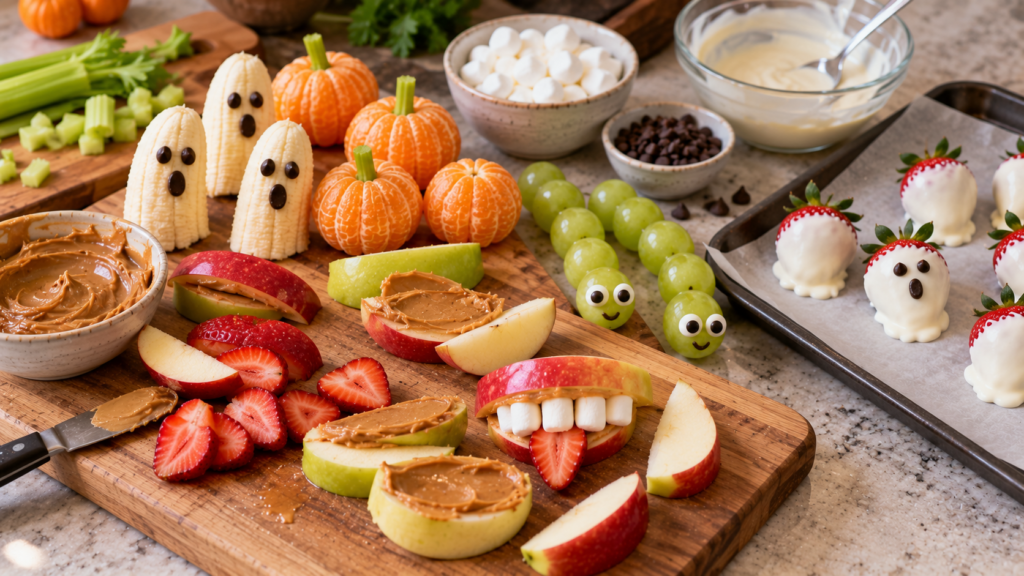
16. Dip the Strawberries
Hold a completely dry strawberry by its leafy top and dip it into the melted white chocolate.
Let excess chocolate drip back into the bowl.
Place the strawberry on parchment paper.
Repeat with the remaining strawberries.
17. Create the Ghost Shape
When placing each dipped strawberry down, allow a little white chocolate to trail behind it.
That imperfect little tail helps create the appearance of a ghost.
Don’t try to make every strawberry identical.
18. Add Ghost Faces
Allow the white chocolate to begin setting.
Use a small amount of melted semi-sweet chocolate to create two eyes and a small open mouth on each strawberry.
Let the chocolate set completely.
19. Assemble the Halloween Fruit Platter
Now arrange all five designs on your large platter.
Create small groups rather than perfectly straight rows.
Place several clementine pumpkins together, cluster the banana ghosts in another area, and position the monster apple mouths around the edges.
Let the grape caterpillars curve naturally through open spaces.
Add the strawberry ghosts where their white coating creates contrast against the other fruit.
20. Serve
Serve the platter soon after assembling it for the freshest appearance and best texture.
Keep it refrigerated if it won’t be served immediately.
Equipment You’ll Need
You don’t need special Halloween equipment for this recipe. A large serving platter, cutting board, sharp kitchen knife, small microwave-safe bowl, parchment paper, small spoon, and pastry brush are enough.
If children are helping, adults should handle the knife and melted chocolate.
Variations and Substitutions
Nut-Free Monster Mouths
If you’re serving this at a school event or around anyone with peanut allergies, replace the peanut butter with a suitable nut-free spread.
Always check individual product labels when allergies are involved.
Chocolate Banana Ghosts
Instead of inserting chocolate chips, use melted chocolate to draw the ghost faces.
Mandarin Pumpkins
Fresh mandarins work just as well as clementines.
Choose small varieties that hold together after peeling.
Purple Grape Caterpillars
Use purple grapes instead of green, or alternate green and purple grapes for a more colorful platter.
Strawberry Mummies
Instead of making ghosts, drizzle thin lines of white chocolate over strawberries to create mummy-style wrapping.
Add Kiwi Monsters
Halved kiwi can add another bright green element to the platter. Use chocolate or edible candy eyes to turn them into simple monster faces.
Pro Tips for the Best Halloween Fruit Platter
Dry the fruit thoroughly. This is particularly important before dipping strawberries in chocolate.
Choose firm bananas. Very ripe bananas will become soft quickly.
Don’t prepare apples too early. Even with lemon juice, freshly cut apples look best when prepared relatively close to serving time.
Use lemon juice sparingly. A light coating slows oxidation without making the fruit taste strongly of lemon.
Don’t make everything identical. Different monster expressions and slightly different ghost shapes make the platter much more playful.
Keep the arrangement natural. A Halloween fruit platter should look abundant and fun, not like every grape was positioned with a ruler.
Keep cold fruit cold. If you’re not serving the platter immediately, refrigerate it.
Remember food safety with children. Adults should handle knives, hot melted chocolate, and any other potentially hazardous preparation.
Make-Ahead Instructions
Some components can be prepared ahead, while others are much better made shortly before serving.
The Night Before
You can wash and thoroughly dry the grapes and strawberries.
You can also make the strawberry ghosts, allow the chocolate to set, and refrigerate them in an airtight container.
Clementine pumpkins can also be assembled several hours ahead.
Shortly Before Serving
Prepare the banana ghosts and apple monster mouths as close to serving time as practical.
Both fruits naturally brown after cutting.
The lemon juice helps, but it doesn’t stop oxidation forever.
Assemble the final platter shortly before your guests arrive.
How to Store Leftovers
Separate the different fruits when possible and place them into airtight containers.
Refrigerate promptly.
Most components are best eaten within 1–2 days, although their textures will change at different rates.
The banana ghosts are the least suitable for extended storage because cut bananas soften and brown quickly.
Apple monster mouths may also soften, particularly once they’ve been assembled with peanut butter, marshmallows, and strawberries.
For those reasons, this platter is best enjoyed fresh.
Frequently Asked Questions
What Fruit Is Good for Halloween?
Orange, green, red, purple, and pale fruits work especially well because they naturally fit Halloween colors.
Clementines, bananas, apples, grapes, strawberries, kiwi, and blackberries are all easy options.
How Do You Keep Fruit From Turning Brown on a Halloween Platter?
A light coating of lemon juice can slow oxidation on bananas and apples.
The most effective solution, however, is simply cutting those fruits reasonably close to serving time.
Can I Make a Halloween Fruit Platter the Night Before?
You can prepare parts of it the night before, but I wouldn’t fully assemble everything that early.
Strawberry ghosts, washed grapes, and clementine pumpkins can be prepared ahead.
Wait until closer to serving time for the bananas and apple mouths.
Is This Halloween Fruit Platter Healthy?
The platter is centered around fresh fruit, although some components include chocolate, marshmallows, peanut butter, candy eyes, and sprinkles.
It’s better to think of it as a fruit-based Halloween treat rather than assigning the entire platter a strict health label.
Can Kids Make This?
Kids can help with many parts, including adding banana faces, inserting clementine stems, arranging grapes, and assembling the platter.
Adults should handle cutting and hot melted chocolate.
Can I Take This to a School Halloween Party?
Potentially, but check the school’s food and allergy policies first.
Peanut products may be prohibited, and some schools may restrict homemade food.
If peanuts aren’t permitted, use an approved nut-free spread or leave the monster mouths off the platter.
What Can I Use Instead of Candy Eyes?
Tiny dots of melted chocolate work perfectly.
This also keeps you from buying a specialty ingredient you’ll only use once.
How Much Fruit Do I Need Per Person?
It depends on whether the platter is the main snack or one item among many Halloween foods.
This recipe makes a medium party platter suitable for approximately 8–10 people when served alongside other snacks and desserts.
What to Serve With a Halloween Fruit Platter
The biggest advantage of this platter is that it balances richer Halloween foods.
For a full Yummizer Halloween table, serve it alongside Graveyard Dirt Cups for something creamy and chocolatey, Monster Cookies for a chewy baked treat, and Mummy Brownies for chocolate lovers.
Our Perfect Candy Corn Sugar Cookie Bars add the classic orange-yellow-white candy corn theme and look especially festive next to the clementine pumpkins.
If you’re serving savory foods as well, the fruit platter can sit between your appetizer and dessert sections and give everyone something fresh to snack on throughout the party.
Troubleshooting Your Halloween Fruit Platter
Bananas Turned Brown
They were probably cut too early or left exposed to air for too long.
Next time, prepare them closer to serving and lightly brush the exposed surfaces with lemon juice.
Apples Are Browning
Treat them with a small amount of lemon juice immediately after cutting and keep them refrigerated until you’re ready to assemble.
White Chocolate Won’t Stick to Strawberries
The strawberries were probably damp.
Chocolate and water don’t work well together, so wash the berries beforehand and allow them to dry completely.
White Chocolate Became Thick or Grainy
It may have been overheated or exposed to moisture.
Melt white chocolate slowly in short intervals and stir frequently.
Monster Mouths Keep Sliding Apart
There’s probably too much peanut butter or the apple wedges are too thin.
Use slightly thicker wedges and only enough peanut butter to hold the fillings.
Candy Eyes Fall Off the Grapes
Use a tiny dab of melted chocolate as edible “glue” and let it set before moving the caterpillar.
Nutrition Information
Because this platter contains five different fruit treats and everyone will choose different portions, nutrition will vary considerably.
An approximate mixed serving may contain:
Calories: 190
Carbohydrates: 35g
Protein: 3g
Fat: 6g
Fiber: 4g
Sugar: 25g
Sodium: 45mg
These values are estimates and will change depending on serving size and the amounts of chocolate, peanut butter, and marshmallows used.
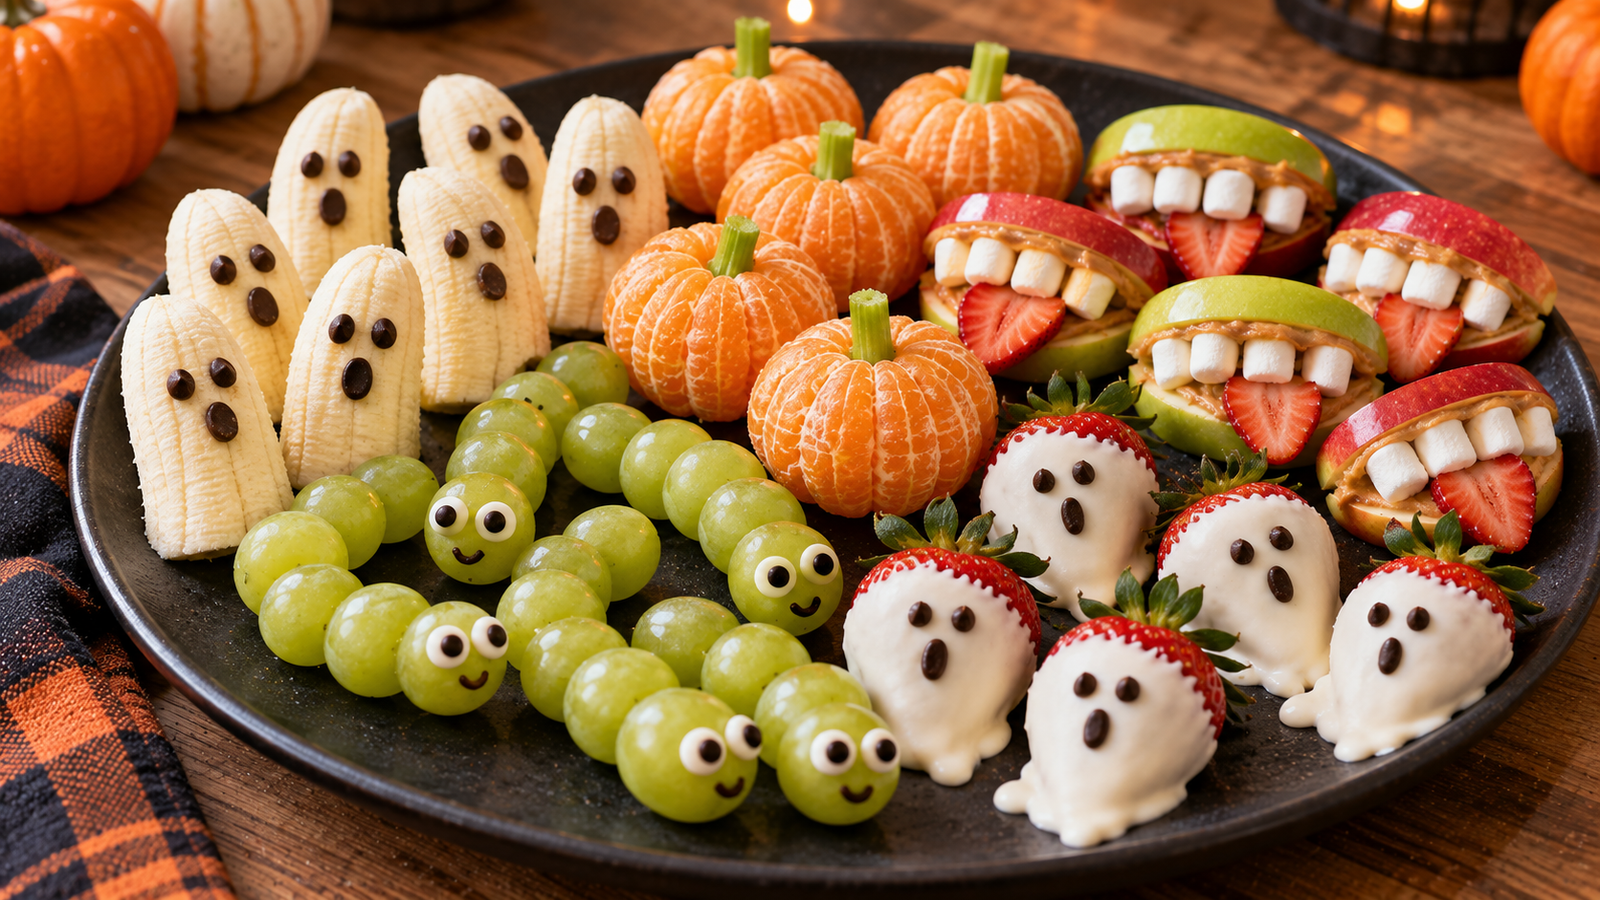
Easy Halloween Fruit Platter with 5 Spooky Fruit Ideas
Ingredients
Method
- Wash the apples, strawberries, grapes, and celery and dry thoroughly.
- Peel the bananas and cut each one in half crosswise.
- Press two mini chocolate chips into each banana for eyes and another for the mouth. Lightly brush exposed banana with lemon juice.
- Peel the clementines while keeping each fruit intact.
- Cut celery into small stem-shaped pieces and insert one into the top of each clementine.
- Cut the apples into thick wedges and remove the cores. Lightly brush cut surfaces with lemon juice.
- Spread peanut butter onto the inside surfaces of two apple wedges.
- Arrange mini marshmallows between the wedges to create teeth.
- Add a thin strawberry slice for a tongue and gently sandwich the apple wedges together.
- Arrange 6–8 green grapes in a curved line for each caterpillar.
- Attach candy eyes to the front grape with tiny dots of melted chocolate.
- Melt white chocolate in 20-second microwave intervals, stirring between each interval.
- Dip completely dry whole strawberries into the white chocolate.
- Place on parchment paper, allowing a small chocolate trail to create a ghost-like shape.
- Once partially set, add eyes and mouths with melted semi-sweet chocolate.
- Allow strawberry ghosts to set completely.
- Arrange all five Halloween fruit designs naturally on a large serving platter.
- Refrigerate until serving if necessary and serve fresh.
Notes
- Prepare bananas and apples relatively close to serving time.
- Use lemon juice lightly to help reduce browning.
- Make sure strawberries are completely dry before dipping them in chocolate.
- Substitute a suitable nut-free spread for peanut butter when necessary.
- Adults should handle knives and hot melted chocolate when children are helping.
- If serving at school, check allergy and homemade-food policies first.
- Leftovers should be refrigerated, although the platter has the best appearance and texture when freshly assembled.