Crispy Baked Spaghetti Nests with Parmesan – Easy Cheesy Muffin Tin Pasta Bites
Golden, crispy edges, tender spaghetti, melted cheese, and a warm bowl of marinara sauce for dipping—these Crispy Baked Spaghetti Nests with Parmesan turn everyday pasta into something irresistible. Each little nest is baked in a muffin tin until the outside becomes lightly crunchy while the center stays soft, cheesy, and full of flavor. They’re perfect for parties, family lunches, after-school snacks, or whenever you want a fun alternative to traditional spaghetti.
What makes this recipe especially appealing is how simple it is. You don’t need complicated ingredients or special cooking skills. Cook the spaghetti, toss it with Parmesan, mozzarella, eggs, garlic, and a little melted butter, then twist the pasta into individual muffin cups. After a short trip to the oven, you’ll have beautifully golden spaghetti nests that are easy to pick up and dip into your favorite marinara sauce.
These baked spaghetti nests are also a wonderful way to use leftover plain spaghetti. They’re easy to customize with vegetables, herbs, or your favorite cheeses, and they look impressive on a serving platter without requiring much effort. Whether you’re preparing a casual weekend lunch or putting together a holiday appetizer spread, this cheesy pasta recipe is sure to become a favorite.
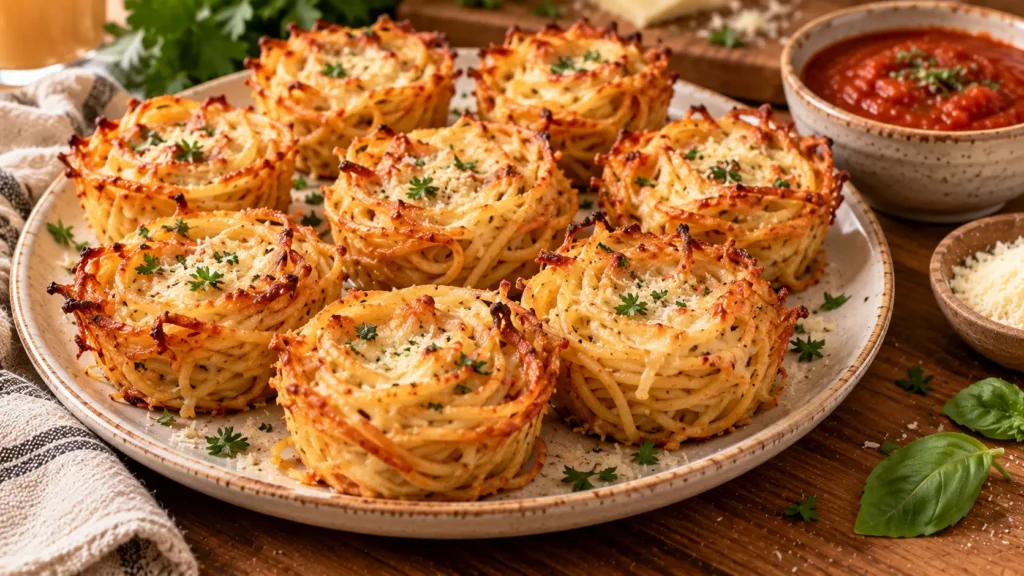
Easy Crispy Baked Spaghetti Nests with Parmesan
If you love pasta but want to serve it in a different way, these crispy baked spaghetti nests are a delicious place to start.
Instead of serving spaghetti in a large bowl, this recipe transforms individual portions into compact little nests using a standard muffin tin.
The spaghetti is tossed with melted butter, freshly grated Parmesan, shredded mozzarella, eggs, and Italian seasonings. This mixture gives the pasta plenty of flavor while helping the strands hold together during baking.
As the nests cook, the exposed spaghetti edges become golden and slightly crisp. Meanwhile, the cheese melts throughout the center, creating a tender, satisfying texture.
The result is a wonderful combination of crunchy edges and soft, cheesy pasta.
One of the biggest advantages of this recipe is its versatility. You can serve the nests as appetizers with marinara sauce, pack them into lunchboxes, or pair them with a fresh salad for a light meal.
They’re also a great option for families with children because the individual portions are easy to serve and fun to eat.
If you enjoy comforting pasta recipes, you might also love our One-Pot Garlic Parmesan Pasta with Spinach and Mushrooms or Creamy Tomato Garlic Pasta. These spaghetti nests offer a completely different texture while using similarly familiar ingredients.
Why You’ll Love These Crispy Baked Spaghetti Nests
Crispy edges and cheesy centers: The muffin tin helps create golden pasta edges while keeping the middle tender.
Easy to make: The recipe uses simple ingredients and straightforward steps.
Perfect individual portions: Each spaghetti nest is conveniently sized for serving.
Kid-friendly: These cheesy pasta bites are fun to eat and easy to dip.
Great for parties: Arrange them on a platter with marinara sauce for an attractive appetizer.
Budget-friendly: Spaghetti, eggs, and cheese are affordable pantry and refrigerator staples.
Customizable: Add vegetables, herbs, cooked chicken, or other favorite ingredients.
Make-ahead friendly: Prepare the nests ahead of time and reheat them in the oven.
Excellent for leftover pasta: Plain cooked spaghetti can be transformed into something new.
No special equipment required: A standard muffin tin is all you need to create the nest shape.
Ingredients for Crispy Baked Spaghetti Nests
The ingredients are simple, but each one plays an important role in creating flavorful, crispy pasta nests that hold their shape.
For the Spaghetti Nests
8 ounces (225g) dry spaghetti
Spaghetti is the main ingredient and gives the nests their distinctive appearance.
Regular spaghetti works particularly well because the strands are flexible enough to twist into muffin cups.
You can also use thin spaghetti, although it may crisp more quickly.
Avoid very thick pasta shapes because they can be difficult to arrange into compact nests.
2 tablespoons (28g) unsalted butter, melted
Melted butter coats the pasta and adds a rich, savory flavor.
It also helps the exposed strands brown during baking.
Olive oil can be used instead if you prefer.
¾ cup (75g) freshly grated Parmesan cheese
Parmesan provides the signature cheesy flavor and helps create golden, savory edges.
Freshly grated Parmesan melts and distributes more evenly than some packaged varieties.
Its salty, nutty flavor is especially delicious with garlic and Italian herbs.
½ cup (55g) shredded low-moisture mozzarella cheese
Mozzarella creates a soft, melty center.
Use low-moisture mozzarella rather than fresh mozzarella packed in water, which can release too much liquid during baking.
2 large eggs
Eggs help bind the spaghetti strands together.
Without them, the nests are more likely to fall apart when removed from the muffin tin.
They also contribute to the lightly golden texture.
2 cloves garlic, finely minced
Fresh garlic adds a delicious savory aroma.
Finely mincing it helps distribute the flavor throughout the pasta.
1 teaspoon Italian seasoning
Italian seasoning provides a blend of herbs that complements the cheese and garlic.
Most blends contain oregano, basil, thyme, or rosemary.
½ teaspoon kosher salt, or to taste
Salt enhances the pasta and cheese flavors.
Because Parmesan is already salty, taste the mixture before adding extra salt where possible. Since the mixture contains raw egg, taste and adjust the cooked pasta seasoning before adding the eggs.
¼ teaspoon freshly ground black pepper
Black pepper adds mild warmth and balances the richness of the cheese.
2 tablespoons finely chopped fresh parsley
Parsley brings freshness and a subtle herbal flavor.
You can substitute fresh basil for a different flavor.
Olive oil or nonstick cooking spray, for greasing the muffin tin
Greasing the muffin tin is essential for preventing the nests from sticking.
Be generous around the bottom and sides of each muffin cup.
For Serving
1 cup (240ml) warm marinara sauce
Marinara sauce adds a bright tomato flavor that balances the rich, cheesy pasta.
Serve it in a small bowl for dipping.
If you’re a fan of tomato-based pasta dishes, the flavors will remind you of our cozy Creamy Tomato Garlic Pasta, but in a fun, crispy appetizer format.
2 tablespoons additional grated Parmesan cheese
A final sprinkle of Parmesan makes the nests even more flavorful.
Fresh basil or parsley, optional
Fresh herbs add color and a finishing touch.

How to Make Crispy Baked Spaghetti Nests with Parmesan
The secret to perfect spaghetti nests is cooking the pasta just until al dente, coating it evenly with the cheese mixture, and pressing it gently into well-greased muffin cups.
Follow these detailed steps for the best results.
Step 1: Preheat the Oven
Preheat your oven to 400°F (200°C).
Position a rack in the center of the oven so the nests bake evenly.
A properly preheated oven helps the edges become crispy without drying out the centers.
Step 2: Prepare the Muffin Tin
Lightly grease all 12 cups of a standard muffin tin with olive oil or nonstick cooking spray.
Coat the bottom and sides thoroughly.
This is particularly important because the melted cheese can stick to the metal during baking.
A well-greased nonstick muffin tin generally gives the best results.
Step 3: Bring Water to a Boil
Fill a large pot with water and bring it to a rolling boil.
Add enough salt to season the pasta water lightly.
Step 4: Cook the Spaghetti
Add 8 ounces of dry spaghetti to the boiling water.
Cook according to the package instructions, stopping approximately 1 minute before the pasta reaches your preferred al dente texture.
The spaghetti will continue cooking in the oven.
Avoid overcooking it now, or the finished nests may become too soft.
Step 5: Drain the Pasta
Drain the spaghetti thoroughly in a colander.
Shake gently to remove excess water.
Too much moisture can prevent the pasta from developing crispy edges.
Step 6: Let the Spaghetti Cool Slightly
Transfer the drained spaghetti to a large mixing bowl.
Allow it to cool for approximately 3–5 minutes.
The pasta should remain warm but not piping hot when the eggs are added.
This helps prevent the eggs from scrambling during mixing.
Step 7: Add Melted Butter
Pour the melted butter over the warm spaghetti.
Toss gently with tongs until the strands are evenly coated.
The butter adds flavor and helps encourage browning during baking.
Step 8: Add the Parmesan Cheese
Sprinkle the grated Parmesan over the spaghetti.
Toss until the cheese is distributed throughout the pasta.
Some of the Parmesan may begin to cling to the warm strands, which is exactly what you want.
Step 9: Add Mozzarella
Add the shredded mozzarella.
Mix gently to distribute it evenly.
The mozzarella will create soft, cheesy pockets in the finished nests.
Step 10: Prepare the Egg Mixture
In a separate small bowl, whisk together the eggs, minced garlic, Italian seasoning, salt, and black pepper.
Whisk until the mixture is smooth and the seasonings are evenly distributed.
Step 11: Combine the Pasta and Egg Mixture
Make sure the spaghetti has cooled enough that it won’t cook the eggs immediately.
Pour the egg mixture over the pasta.
Use tongs to toss thoroughly until all the spaghetti strands are lightly coated.
This coating helps the nests hold together after baking.
Step 12: Add Fresh Parsley
Sprinkle the chopped parsley over the pasta.
Toss once more to distribute it evenly.
The spaghetti mixture should now look lightly coated with cheese, herbs, and egg.
Step 13: Divide the Spaghetti into Portions
Divide the spaghetti mixture into approximately 12 equal portions.
You can do this directly with tongs or by arranging small portions on a clean work surface.
Try to keep the portions reasonably even so the nests bake at the same rate.
Step 14: Twist the First Spaghetti Nest
Use tongs or a fork to lift one portion of spaghetti.
Twist the strands gently into a loose spiral.
Place the spiral into one prepared muffin cup.
The spaghetti should resemble a small nest.
Step 15: Fill the Remaining Muffin Cups
Repeat with the remaining portions.
Gently press each nest down so it fits securely into its muffin cup.
Don’t compress the pasta too tightly.
Leaving a few strands slightly exposed helps create crisp, golden edges.
Step 16: Shape the Centers
Use the back of a spoon to create a shallow indentation in the center of each nest.
This helps establish the classic nest shape.
The indentation should be shallow rather than a large empty hole.

Step 17: Add a Little Extra Parmesan
Sprinkle a small amount of additional Parmesan over the tops if desired.
This encourages an extra golden, cheesy finish.
Step 18: Bake the Spaghetti Nests
Place the muffin tin in the preheated oven.
Bake for 20–25 minutes, checking around the 18-minute mark.
The nests are ready when the tops and exposed edges are golden brown, the centers are set, and the pasta feels firm enough to hold together.
Ovens vary, so adjust the baking time as needed.
Step 19: Let the Nests Rest
Remove the muffin tin from the oven.
Allow the spaghetti nests to rest in the pan for approximately 5–7 minutes.
This short resting time helps them firm up and makes them easier to remove.
Step 20: Remove and Serve
Run a thin silicone spatula or butter knife carefully around the edges of each nest.
Lift them out gently and arrange them on a serving platter.
Sprinkle with additional Parmesan and fresh parsley or basil.
Serve warm with marinara sauce for dipping.
Equipment You’ll Need
You don’t need any specialized kitchen equipment to make this recipe.
Standard 12-cup muffin tin: Creates the individual spaghetti nest shapes and encourages crispy edges.
Large pot: Used for boiling the spaghetti.
Colander: Helps drain the pasta thoroughly.
Large mixing bowl: Provides enough room to toss the spaghetti with cheese and seasonings.
Small mixing bowl: Used for whisking the eggs and seasonings.
Tongs: Make it easier to coat, portion, and twist the spaghetti.
Measuring cups and spoons: Help keep ingredient quantities accurate.
Whisk: Ensures the eggs and seasonings are combined evenly.
Silicone spatula: Useful for gently releasing the baked nests.
Serving platter: Perfect for presenting the finished spaghetti nests with marinara sauce.
What Makes Spaghetti Nests Crispy?
The crispy texture comes from a combination of high oven heat, exposed pasta strands, melted cheese, and a small amount of fat.
When the spaghetti is twisted into individual portions, some strands remain exposed along the top and edges.
These exposed strands dry slightly during baking and develop a golden texture.
Parmesan cheese also contributes to browning, especially where it touches the sides of the muffin tin.
The melted butter helps coat the pasta and encourages a lightly crisp finish.
Meanwhile, the egg mixture binds the spaghetti together and helps the center remain tender.
For the best balance of crispy and soft textures, avoid packing the spaghetti too tightly into the muffin cups.
Delicious Spaghetti Nest Variations
Mini Pepperoni Pizza Spaghetti Nests
Add ¼ cup finely chopped pepperoni and a little extra mozzarella to the pasta mixture.
Serve with warm pizza sauce instead of marinara.
This version is especially fun for family movie nights.
Spinach and Parmesan Spaghetti Nests
Add ½ cup finely chopped cooked spinach.
Squeeze the spinach thoroughly to remove excess moisture before mixing it into the pasta.
The spinach adds color and a mild vegetable flavor.
Cheesy Garlic Spaghetti Nests
Increase the garlic to 3 cloves and add an extra ¼ cup Parmesan.
This version has a stronger garlic and cheese flavor.
Chicken Alfredo Spaghetti Nests
Fold in ½ cup finely chopped cooked chicken.
Serve with a small amount of warm Alfredo sauce.
Avoid adding too much sauce directly to the spaghetti mixture because excess moisture can prevent crisping.
Broccoli and Cheese Spaghetti Nests
Add ½ cup very finely chopped, cooked broccoli.
Make sure the broccoli is well drained.
This is a great way to include vegetables in a kid-friendly pasta recipe.
Spicy Parmesan Spaghetti Nests
Add ¼ teaspoon crushed red pepper flakes to the egg mixture.
Serve with spicy marinara sauce.
Pesto Spaghetti Nests
Add 1–2 tablespoons basil pesto to the spaghetti mixture.
Reduce the butter slightly if your pesto contains a generous amount of oil.
This variation has a fresh basil flavor and beautiful green flecks.
Three-Cheese Spaghetti Nests
Combine Parmesan, mozzarella, and a small amount of shredded provolone.
The different cheeses create a rich, savory flavor.
Pro Tips for Perfect Crispy Spaghetti Nests
Cook the spaghetti al dente. Slightly firm pasta holds its shape better and won’t become mushy during baking.
Drain thoroughly. Excess water can make the nests soggy.
Cool before adding eggs. If the spaghetti is too hot, the eggs may begin to scramble.
Use freshly grated Parmesan. It provides excellent flavor and helps the pasta brown.
Choose low-moisture mozzarella. Fresh mozzarella contains too much water for this recipe.
Grease the muffin tin well. This prevents the cheese and pasta from sticking.
Twist the pasta gently. Loose spirals create attractive nests with crispy exposed strands.
Don’t overfill the cups. The spaghetti should fit comfortably inside each muffin cup.
Avoid overpacking. Press the nests just enough to help them hold their shape.
Bake until golden. The exposed edges should look lightly browned, not pale.
Let them rest before removing. A few minutes of cooling helps the nests become more stable.
Serve with sauce on the side. Adding marinara before baking can soften the pasta and reduce crispiness.
Can You Make Spaghetti Nests Ahead of Time?
Yes.
These crispy baked spaghetti nests are convenient for meal preparation and entertaining.
You can cook the spaghetti and prepare the cheese mixture several hours in advance.
Store the prepared components in the refrigerator until you’re ready to assemble.
For the best results, combine the pasta with the egg mixture shortly before filling the muffin tin.
You can also fully bake the nests ahead of time.
Allow them to cool, then refrigerate in an airtight container.
When you’re ready to serve, reheat them in the oven to restore some of their crispy texture.
For food safety, refrigerate cooked pasta promptly rather than leaving it at room temperature for an extended period.
How to Store Leftover Spaghetti Nests
Allow the nests to cool briefly after baking.
Transfer them to an airtight container and refrigerate within 2 hours.
Store in the refrigerator for 3–4 days.
For the best texture, keep the marinara sauce in a separate container.
This prevents the spaghetti from absorbing moisture and becoming soft.
How to Reheat Crispy Spaghetti Nests
Oven Method
Preheat the oven to 375°F (190°C).
Place the nests on a lightly greased baking sheet.
Heat for approximately 8–12 minutes, or until thoroughly hot.
For refrigerated leftovers, reheat to 165°F (74°C).
The oven helps restore some of the original crispiness.
Air Fryer Method
Preheat the air fryer to approximately 350°F (175°C).
Arrange the nests in a single layer.
Heat for 4–6 minutes, checking frequently.
Cooking time varies depending on the size of the nests and your air fryer.
Make sure leftovers are heated thoroughly.
Microwave Method
Place the nests on a microwave-safe plate.
Heat in short intervals until hot throughout.
The microwave is convenient, but the pasta edges will become softer.
If crispiness is important, the oven or air fryer is a better choice.
Can You Freeze Baked Spaghetti Nests?
Yes.
Allow the baked nests to cool completely.
Arrange them in a single layer on a baking sheet and freeze until firm.
Transfer them to a freezer-safe container or bag.
Freeze for up to 2 months for the best quality.
To reheat, place the frozen nests on a baking sheet and bake at 375°F (190°C) until thoroughly heated.
The exact time will depend on their size and whether they were frozen individually.
Reheat to 165°F (74°C).
Keep the marinara sauce separate until serving.
Frequently Asked Questions
Can I Use Leftover Spaghetti?
Absolutely.
Plain cooked spaghetti works well in this recipe.
Make sure it has been stored safely in the refrigerator and isn’t already coated in a large amount of sauce.
Do I Have to Use Eggs?
Eggs help bind the spaghetti together.
Without them, the nests may fall apart when removed from the muffin tin.
For an egg-free version, you’ll need an alternative binder, but the results may differ.
Can I Use Angel Hair Pasta?
Yes, although angel hair is thinner and may become crispy more quickly.
Check the nests earlier during baking.
Can I Use Gluten-Free Spaghetti?
Yes.
Choose a gluten-free spaghetti that holds its shape after cooking.
Be careful not to overcook it.
Why Are My Spaghetti Nests Falling Apart?
The pasta may not have been coated evenly with the egg mixture, or the nests may not have rested long enough after baking.
Make sure the eggs are well distributed and allow the nests to cool slightly before removing them.
Why Aren’t My Spaghetti Nests Crispy?
Excess moisture, underbaking, or tightly packed pasta can prevent crisping.
Drain the spaghetti thoroughly, leave some strands exposed, and bake until the edges are golden.
Can I Use Fresh Mozzarella?
Low-moisture mozzarella is better.
Fresh mozzarella can release excess liquid and make the nests softer.
Can I Add Meat?
Yes.
Finely chopped cooked chicken, cooked ground beef, or cooked sausage can be added in small amounts.
Avoid overfilling the muffin cups.
Can I Make Mini Spaghetti Nests?
Yes.
Use a mini muffin tin and divide the pasta into smaller portions.
Reduce the baking time and check frequently because smaller nests cook faster.
Can I Serve These Cold?
They can be eaten cold if stored safely, but their texture and flavor are best when served warm.
What Sauce Goes Best with Spaghetti Nests?
Marinara is a classic choice.
You can also serve them with pesto, Alfredo sauce, or a creamy garlic dipping sauce.
Can I Double the Recipe?
Yes.
Use two standard muffin tins or bake in batches.
Avoid overcrowding the oven so the nests brown evenly.
What to Serve with Crispy Baked Spaghetti Nests
These cheesy pasta bites pair well with a variety of sides and dipping sauces.
Marinara Sauce
Warm marinara is the classic choice.
Its tangy tomato flavor balances the rich Parmesan and mozzarella.
Fresh Green Salad
A simple green salad with a light vinaigrette adds freshness.
Our Harvest Kale & Apple Salad with Cranberries is another flavorful option when you’re preparing a seasonal lunch.
Garlic Bread
Serve the nests alongside warm garlic bread for a comforting pasta-themed meal.
Roasted Vegetables
Roasted broccoli, zucchini, or carrots add color and texture.
For a seasonal option, try our Maple Roasted Brussels Sprouts with Bacon.
Creamy Dipping Sauces
A small bowl of Alfredo sauce or creamy garlic Parmesan sauce makes a rich alternative to marinara.
Soup
Pair the nests with a warm bowl of Creamy Butternut Squash Soup for a cozy lunch.
Troubleshooting Crispy Baked Spaghetti Nests
The Nests Stick to the Muffin Tin
The muffin cups may not have been greased thoroughly.
Use a good-quality nonstick muffin tin and coat each cup generously.
Allow the nests to rest briefly before removing them.
The Nests Are Too Soft
The pasta may have been overcooked or the nests may need more oven time.
Use al dente spaghetti and bake until the edges become golden.
The Edges Are Burning
The spaghetti may be too thin or the oven may be running hot.
Check the nests earlier and reduce the temperature slightly if needed.
The Centers Are Too Wet
The pasta may not have been drained properly, or the mozzarella may have released too much moisture.
Use low-moisture mozzarella and drain the spaghetti thoroughly.
The Nests Won’t Hold Their Shape
Make sure the egg mixture coats the spaghetti evenly.
Press the nests gently into the muffin cups and allow them to rest after baking.
The Pasta Tastes Bland
Add a little more Parmesan, garlic, Italian seasoning, or black pepper.
Serve with a flavorful marinara sauce.
The Nests Are Too Dry
They may have baked too long.
Remove them once the edges are golden and the centers are set.
A little extra marinara sauce can also help when serving.
Nutrition Information
The following values are estimates for one spaghetti nest, based on 12 servings, excluding marinara dipping sauce and optional extra toppings.
| Nutrient | Approximate amount per nest |
|---|---|
| Calories | 150 kcal |
| Protein | 7g |
| Carbohydrates | 15g |
| Fat | 7g |
| Saturated Fat | 3g |
| Fiber | 1g |
| Sugar | 1g |
| Sodium | 240mg |
Nutrition values vary depending on the spaghetti, cheese brands, and portion sizes.
For accurate nutrition information, calculate using the exact ingredients you use.
Final Thoughts
These Crispy Baked Spaghetti Nests with Parmesan are proof that simple ingredients can become something special with just a little creativity.
With their golden edges, tender cheesy centers, and convenient individual portions, they’re a fun alternative to traditional pasta dishes.
They’re easy enough for a weekday family lunch but attractive enough to serve as appetizers at parties and gatherings.
Whether you enjoy them with marinara sauce, add your favorite vegetables, or prepare a batch for meal planning, these cheesy muffin tin spaghetti bites are a delicious recipe worth keeping.
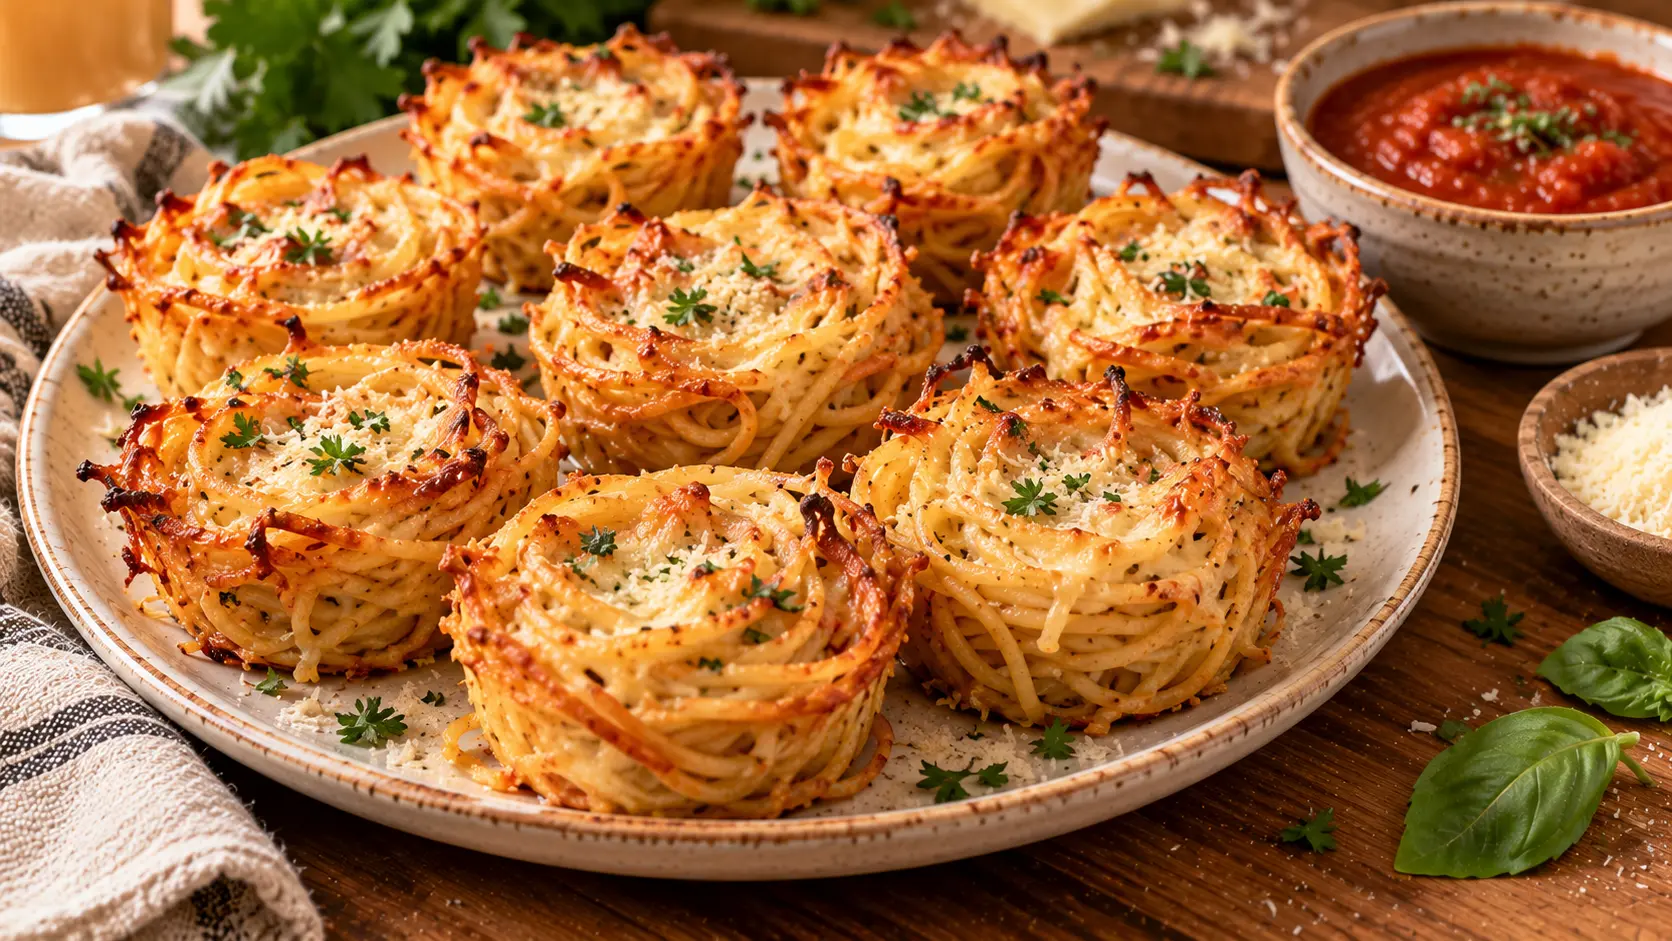
Crispy Baked Spaghetti Nests with Parmesan
Ingredients
Method
- Preheat the oven to 400°F (200°C).
- Generously grease a standard 12-cup muffin tin.
- Bring a large pot of lightly salted water to a boil.
- Cook spaghetti until just shy of al dente.
- Drain thoroughly.
- Transfer spaghetti to a mixing bowl and cool for 3–5 minutes.
- Toss with melted butter.
- Add ¾ cup Parmesan and mix.
- Add shredded mozzarella.
- In a separate bowl, whisk eggs, garlic, Italian seasoning, salt, and black pepper.
- Pour the egg mixture over the slightly cooled spaghetti and toss thoroughly.
- Add chopped parsley.
- Divide the pasta into 12 equal portions.
- Twist one portion into a loose spiral using tongs or a fork.
- Place the spiral into a prepared muffin cup and repeat with remaining spaghetti.
- Press each portion gently and create a shallow indentation in the center.
- Sprinkle with additional Parmesan if desired.
- Bake for 20–25 minutes, until golden around the edges and set in the center.
- Rest in the muffin tin for 5–7 minutes.
- Carefully remove, garnish, and serve warm with marinara sauce.
Notes
-
Cook spaghetti just until al dente to prevent mushy nests.
-
Drain the pasta thoroughly before mixing.
-
Let the spaghetti cool slightly before adding eggs.
-
Use low-moisture mozzarella for the best texture.
-
Grease muffin cups well to prevent sticking.
-
Leave a few spaghetti strands exposed for crispy edges.
-
Avoid packing the pasta too tightly.
-
Bake until the edges are golden brown.
-
Rest for 5–7 minutes before removing from the muffin tin.
-
Serve marinara separately to keep the nests crispy.
-
Refrigerate leftovers for 3–4 days.
-
Freeze for up to 2 months for the best quality.
-
Reheat in the oven or air fryer for a crispier texture.
-
Reheat leftovers thoroughly to 165°F (74°C).