Perfect Black Cocoa Spiderweb Cupcakes – Best Halloween Treat
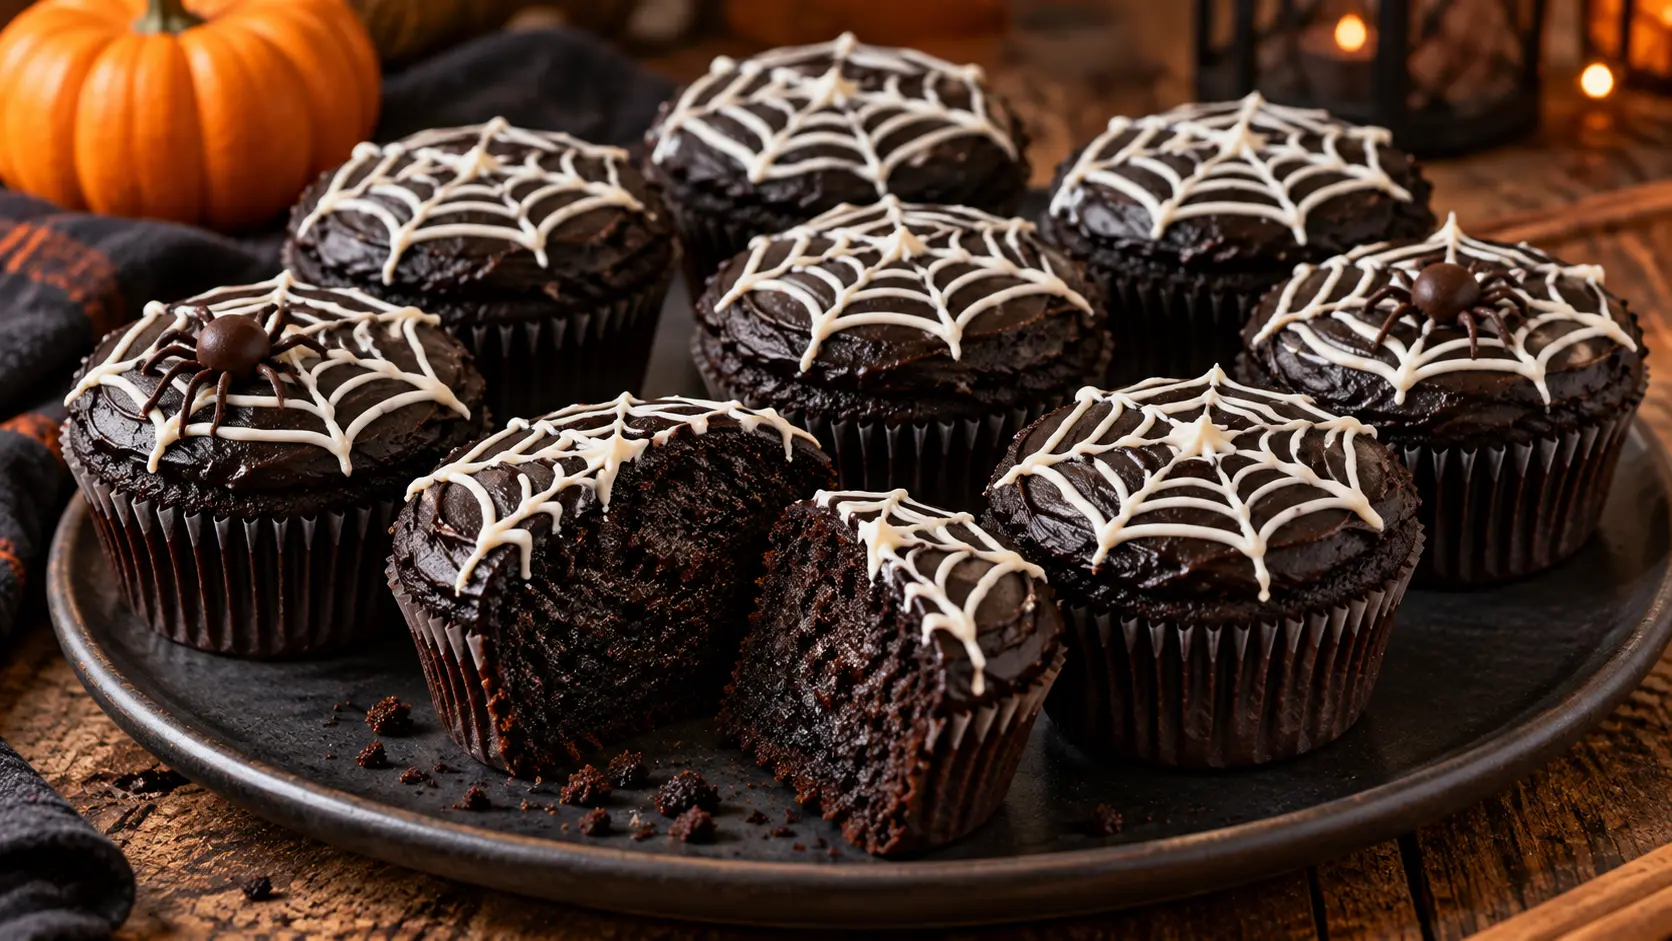
Deep, dark chocolate cupcakes topped with dramatic spiderweb frosting might look like something from a Halloween bakery window, but these Black Cocoa Spiderweb Cupcakes are surprisingly approachable at home. The cupcakes have an almost midnight-black crumb from black cocoa, a rich chocolate flavor, and a soft, moist texture underneath all that spooky decoration.
The real showstopper is the top. Each cupcake gets a smooth layer of dark black cocoa frosting followed by thin rings of contrasting white chocolate or vanilla icing. Dragging a toothpick through those rings transforms them into a striking spiderweb in seconds—no advanced piping skills required.
They’re perfect for Halloween parties, school celebrations, spooky movie nights, or a Halloween dessert table alongside our Graveyard Dirt Cups and Mummy Brownies. They look dramatic enough to become the centerpiece of the table while still tasting like a genuinely good chocolate cupcake.

Easy Black Cocoa Spiderweb Cupcakes for Halloween
Black cocoa is what gives these cupcakes their distinctive appearance.
Unlike ordinary natural cocoa powder, black cocoa is heavily alkalized, which creates an extremely dark color and a smoother, less acidic cocoa flavor. It’s responsible for the recognizable dark chocolate-cookie flavor found in many very dark sandwich cookies.
But using only black cocoa can sometimes produce chocolate cake that tastes flatter than expected.
That’s why this recipe combines black cocoa with Dutch-process cocoa. The black cocoa gives us the dramatic Halloween color while Dutch-process cocoa contributes additional chocolate depth.
The batter also uses brown sugar, oil, eggs, sour cream, and hot coffee. Oil keeps the cupcakes soft even after refrigeration, while sour cream adds moisture and richness.
And don’t worry—the coffee isn’t there to turn these into coffee cupcakes. It simply intensifies the chocolate flavor.
Once they’re completely cool, we’ll decorate them with black cocoa frosting and an easy white spiderweb.
Why You’ll Love These Black Cocoa Spiderweb Cupcakes
Naturally dramatic color. Black cocoa creates a deep, dark cupcake without needing huge amounts of black food coloring.
Rich chocolate flavor. Combining black and Dutch-process cocoa gives the cupcakes more chocolate depth.
Soft and moist. Oil and sour cream help prevent the crumb from becoming dry.
Perfect for Halloween. The black-and-white spiderweb design immediately fits a spooky dessert table.
Easier than they look. You don’t need professional cake-decorating skills to create the webs.
Great party dessert. Individual cupcakes are much easier to serve at Halloween parties than a full cake.
Easy to customize. Add chocolate spiders, Halloween sprinkles, candy eyes, or keep the webs simple and elegant.
If you’re building a full Halloween spread, these also give you something different from our chewy Monster Cookies and colorful Candy Corn Popcorn Bark.
Ingredients You’ll Need
All-Purpose Flour
Regular all-purpose flour provides enough structure for the cupcakes while keeping the crumb tender.
Measure carefully. Packing too much flour into your measuring cup can result in dry, heavy cupcakes.
Black Cocoa Powder
This is the star ingredient.
Black cocoa is highly alkalized cocoa powder with an extremely dark brown-to-black appearance.
It gives the cupcakes their dramatic color without relying entirely on food coloring.
Don’t replace all of it with regular natural cocoa and expect the same appearance.
Dutch-Process Cocoa Powder
Using some Dutch-process cocoa alongside the black cocoa creates a deeper, more rounded chocolate flavor.
Baking Soda
Baking soda provides part of the leavening needed for soft, properly risen cupcakes.
Baking Powder
A little baking powder provides additional lift.
Salt
Chocolate desserts need salt.
It balances the sweetness and helps bring forward the cocoa flavor.
Granulated Sugar
Granulated sugar sweetens the cupcakes and contributes to their soft texture.
Brown Sugar
Brown sugar adds moisture and a subtle caramel-like depth.
Eggs
Eggs provide structure and richness.
Room-temperature eggs incorporate more easily into the batter.
Vegetable Oil
Oil keeps chocolate cupcakes especially moist.
A neutral oil such as vegetable, canola, or sunflower oil works well.
Sour Cream
Full-fat sour cream gives the cupcakes moisture and a tender crumb without making the batter excessively thin.
Plain Greek yogurt can work as a substitute.
Vanilla Extract
Vanilla rounds out the cocoa flavor.
Hot Coffee
Hot coffee helps bloom the cocoa and deepen the chocolate flavor.
You can use hot water instead if you prefer, although the chocolate flavor may be slightly less intense.
Unsalted Butter
Softened unsalted butter forms the base of our black cocoa frosting.
Powdered Sugar
Powdered sugar sweetens and thickens the frosting.
Heavy Cream
A little heavy cream makes the frosting smoother and easier to spread.
White Chocolate
Melted white chocolate creates a bright contrast against the black frosting.
You can alternatively use a simple thick vanilla icing for the spiderwebs.

How to Make Black Cocoa Spiderweb Cupcakes
1. Prepare the Oven
Preheat your oven to 350°F (175°C).
Line a standard 12-cup muffin pan with black, dark brown, or Halloween-themed cupcake liners.
2. Combine the Dry Ingredients
In a medium bowl, whisk together:
- All-purpose flour
- Black cocoa powder
- Dutch-process cocoa powder
- Baking soda
- Baking powder
- Salt
Whisk thoroughly so there are no concentrated pockets of cocoa or leavening.
3. Combine the Sugars
In a large mixing bowl, add the granulated sugar and brown sugar.
Break apart any large brown sugar lumps.
4. Add the Eggs and Oil
Add the eggs and vegetable oil.
Whisk until the mixture looks smooth and slightly glossy.
5. Add Sour Cream and Vanilla
Whisk in the sour cream and vanilla extract.
Continue mixing just until everything is evenly incorporated.
6. Add the Dry Ingredients
Add the dry mixture to the wet ingredients.
Fold or whisk gently until the batter is mostly combined.
Don’t aggressively beat the batter.
7. Add the Hot Coffee
Slowly pour in the hot coffee while whisking gently.
The finished batter will be thinner than a typical vanilla cupcake batter.
That’s normal.
The cocoa should darken noticeably once it meets the hot liquid.
8. Fill the Cupcake Liners
Divide the batter evenly between 12 cupcake liners.
Fill each approximately ⅔ full.
Avoid overfilling, which can cause the cupcakes to overflow and make decorating more difficult.
9. Bake
Bake at 350°F (175°C) for approximately 17–20 minutes.
Insert a toothpick into the center of one cupcake.
It should come out clean or with a few moist crumbs rather than wet batter.
10. Cool Briefly in the Pan
Leave the cupcakes in the pan for approximately 5 minutes.
Then transfer them to a wire cooling rack.
11. Cool Completely
This matters.
Do not attempt to frost warm cupcakes.
Even slightly warm cupcakes can soften the buttercream and ruin the clean spiderweb effect.
Let them cool completely.

12. Make the Black Cocoa Frosting
Beat softened butter until smooth and creamy.
Gradually add powdered sugar.
Add the black cocoa powder, vanilla, salt, and enough heavy cream to create a smooth, spreadable frosting.
Beat until fluffy.
The frosting should be very dark naturally from the cocoa.
If you want it even darker, you can add a tiny amount of black gel food coloring, but this is optional.
13. Frost the Cupcakes
Spread a relatively flat layer of black cocoa frosting across each cupcake.
A small offset spatula works particularly well.
Unlike tall swirled buttercream cupcakes, we want a flatter surface because we’re going to draw the spiderweb on top.
14. Prepare the White Chocolate
Melt the white chocolate gently.
Use short microwave intervals and stir between each one.
Avoid overheating it.
Transfer the melted chocolate to a small piping bag.
Cut an extremely small opening in the tip.
15. Pipe the Spiderweb Rings
Start near the center of one cupcake.
Pipe a small circle.
Then pipe another circle around it.
Continue until you have approximately 3–4 concentric circles.
They don’t need to be perfectly round.
16. Create the Spiderweb
Before the white chocolate sets, place the tip of a clean toothpick at the center of the cupcake.
Drag it outward through all the white circles toward the edge.
Repeat around the cupcake approximately 6–8 times, cleaning the toothpick when necessary.
Those outward lines pull the circles into a web pattern.
17. Let the Web Set
Leave the decorated cupcakes at room temperature until the white chocolate firms.
Don’t stack or cover them while the decoration is still wet.
18. Add Optional Chocolate Spiders
For extra Halloween detail, place a small edible chocolate spider on one side of a few cupcakes.
You don’t need one on every cupcake.
Keeping some cupcakes as simple black-and-white webs creates a more sophisticated platter.
Equipment You’ll Need
You don’t need professional decorating equipment. A standard 12-cup muffin pan, cupcake liners, mixing bowls, whisk, silicone spatula, measuring cups and spoons, wire cooling rack, hand or stand mixer, small offset spatula, piping bag, and toothpicks will handle the entire recipe.
If you don’t have a piping bag, a small zip-top food bag can work for the white chocolate. Fill one corner and snip off a very tiny opening.
Variations & Substitutions
Oreo-Style Spiderweb Cupcakes
Black cocoa naturally has a flavor reminiscent of very dark chocolate sandwich cookies.
Add crushed chocolate sandwich cookies to the frosting or sprinkle a small amount around the edges.
Orange Spiderweb Cupcakes
Tint the white chocolate orange with oil-based candy coloring and create orange webs against the black frosting.
Don’t use ordinary water-based food coloring in melted chocolate because it can cause the chocolate to seize.
Vanilla Spiderweb Icing
Don’t want to work with melted white chocolate?
Combine powdered sugar with a very small amount of milk until you have a thick but pipeable icing.
Use it exactly as you would the white chocolate.
Black Cocoa Cupcakes With Vanilla Frosting
Reverse the colors.
Top the dark cupcakes with white vanilla frosting and create the spiderweb using melted dark chocolate.
Mini Halloween Cupcakes
Bake the batter in a mini muffin pan for bite-sized party cupcakes.
Start checking for doneness significantly earlier because mini cupcakes bake faster.
Spider Cupcakes
Instead of creating webs on every cupcake, decorate a few with small edible chocolate spiders.
This creates visual variety on a Halloween dessert platter.
Pro Tips for Perfect Spiderweb Cupcakes
Use actual black cocoa. Regular cocoa powder won’t create the same dramatic color.
Combine cocoa varieties. Black cocoa gives you color while Dutch-process cocoa strengthens the chocolate flavor.
Don’t overmix. Once the flour enters the batter, mix only as much as necessary.
Don’t overbake. Chocolate cupcakes can look done before you realize they’ve begun drying out.
Cool completely. Warm cupcakes and buttercream are a terrible combination.
Create a flat frosting surface. Spiderwebs are easier to draw on a relatively smooth top.
Cut a tiny piping opening. Thick white chocolate lines make the web look clumsy.
Work one cupcake at a time. Pipe the circles and immediately drag the toothpick through them before moving to the next cupcake.
Clean the toothpick. Wiping it between several strokes keeps the white lines cleaner.
Embrace slight imperfections. Real spiderwebs aren’t perfectly symmetrical, and your cupcakes don’t need to be either.
How to Make These Cupcakes Ahead
The cupcakes themselves can be baked 1 day ahead.
Once completely cool, keep them tightly covered at room temperature.
Prepare and decorate them the following day.
You can also prepare the black cocoa frosting ahead and refrigerate it in an airtight container. Let it soften at room temperature, then beat briefly before using.
For the cleanest appearance, create the spiderweb decoration after the cupcakes have been frosted.
How to Store Black Cocoa Spiderweb Cupcakes
Store finished cupcakes in a covered cupcake container.
They can generally stay at cool room temperature for about 1 day.
For longer storage, refrigerate them for up to 4 days.
Allow refrigerated cupcakes to sit at room temperature for around 20–30 minutes before serving so the buttercream softens and the chocolate flavor becomes more noticeable.
Can You Freeze Black Cocoa Cupcakes?
Yes.
The easiest method is to freeze the undecorated cupcakes.
Allow them to cool completely, wrap them individually, and place them inside a freezer-safe container.
Freeze for up to approximately 2 months for best quality.
Thaw completely before adding frosting and spiderweb decorations.
Freezing already decorated cupcakes is possible, but the appearance of the spiderwebs may suffer from condensation during thawing.
Frequently Asked Questions
What Is Black Cocoa Powder?
Black cocoa is cocoa powder that has undergone heavy alkalization.
That process dramatically darkens the cocoa and gives it a smooth, distinctive chocolate flavor.
Is Black Cocoa the Same as Dutch-Process Cocoa?
They’re related but not identical.
Both are alkalized, but black cocoa undergoes more extensive alkalization and is considerably darker.
Can I Make These Without Black Cocoa?
Technically, yes, but they won’t really be black cocoa cupcakes anymore.
Dark Dutch-process cocoa can create a deep brown cupcake, but it won’t produce the same near-black appearance or characteristic flavor.
Do I Need Black Food Coloring?
No.
That’s one of the advantages of black cocoa.
It naturally produces an extremely dark cupcake and frosting.
If you want truly jet-black frosting, you can use a tiny amount of black gel coloring, but it’s optional.
Can I Taste the Coffee?
You shouldn’t get a strong coffee flavor from the amount used here.
Its primary job is to intensify the chocolate.
Hot water can be substituted.
Why Did My Cupcakes Sink?
Common causes include underbaking, opening the oven too early, adding too much leavening, or significantly overfilling the cupcake liners.
Why Are My Cupcakes Dry?
They were likely overbaked or too much flour was added.
Start checking them at the lower end of the baking range.
Why Is My Frosting Gray Instead of Black?
Black cocoa buttercream often becomes darker after sitting for a short period.
The exact shade also depends on the cocoa brand and butter-to-cocoa ratio.
A tiny amount of black gel coloring can deepen it further if desired.
Why Did My White Chocolate Become Thick?
It may have been overheated or exposed to moisture.
Melt white chocolate gently and make sure all bowls and utensils are completely dry.
How Do I Make the Spiderweb Pattern?
Pipe several concentric circles onto the dark frosting, then drag a toothpick from the center toward the outside edge.
Repeat around the cupcake.
That’s it.
What to Serve With Spiderweb Cupcakes
For a full Halloween dessert table, combine these cupcakes with Graveyard Dirt Cups for another chocolate-heavy dessert and Mummy Brownies for a fun decorated brownie option.
Add Easy Candy Corn Popcorn Bark for something crunchy and colorful, and Monster Cookies for a chewy cookie option.
If you want something lighter among all the chocolate desserts, our Easy Halloween Fruit Platter – 5 Spooky Fruit Ideas gives guests a colorful fruit option while keeping the Halloween theme going.
Nutrition Information
Approximate nutrition per decorated cupcake:
Calories: 455
Protein: 5g
Carbohydrates: 59g
Fat: 24g
Saturated Fat: 11g
Fiber: 3g
Sugar: 43g
Sodium: 250mg
Nutrition information is an estimate and varies according to the exact cocoa, frosting amount, white chocolate, and ingredient brands used.
Perfect Black Cocoa Spiderweb Cupcakes
Ingredients
Method
- Preheat oven to 350°F (175°C) and line a 12-cup muffin pan with cupcake liners.
- Whisk flour, black cocoa, Dutch-process cocoa, baking soda, baking powder, and salt together.
- In a separate large bowl, combine granulated and brown sugar.
- Whisk in eggs and vegetable oil until smooth.
- Add sour cream and vanilla and whisk until combined.
- Add the dry ingredients and gently mix until mostly incorporated.
- Slowly whisk in hot coffee until a smooth, relatively thin chocolate batter forms.
- Divide batter among 12 cupcake liners, filling each approximately ⅔ full.
- Bake for 17–20 minutes, or until a toothpick comes out clean or with a few moist crumbs.
- Cool in the pan for 5 minutes.
- Transfer to a wire rack and cool completely.
- For the frosting, beat softened butter until creamy.
- Gradually beat in powdered sugar and black cocoa.
- Add vanilla, salt, and enough heavy cream to create a smooth spreadable consistency.
- Add a tiny amount of black gel food coloring if a darker shade is desired.
- Spread a smooth, relatively flat layer of frosting over each completely cooled cupcake.
- Gently melt the white chocolate and transfer it to a small piping bag.
- Pipe 3–4 concentric white chocolate circles over one cupcake.
- Immediately drag a clean toothpick from the center outward through the circles approximately 6–8 times to create a spiderweb.
- Repeat with the remaining cupcakes, working one at a time.
- Add optional edible chocolate spiders.
- Allow the decoration to set before serving.
Notes
- True black cocoa provides the darkest natural color.
- Combining black cocoa and Dutch-process cocoa gives better chocolate depth than relying solely on black cocoa.
- Hot water can replace coffee.
- Don’t overfill the cupcake liners.
- Completely cool cupcakes before frosting.
- Create each spiderweb immediately after piping its circles.
- If using food coloring in the buttercream, use concentrated gel coloring rather than adding lots of liquid coloring.
- Store covered for up to 1 day at cool room temperature or refrigerate for up to 4 days.
- Freeze undecorated cupcakes for up to approximately 2 months for best quality.