Spooky Halloween Monster Cookies with Candy Eyes
Halloween cookies should be fun to look at, but they still need to taste like cookies worth eating. These Spooky Halloween Monster Cookies with Candy Eyes are thick, soft-centered cookies packed with semisweet chocolate chips and colorful candy-coated chocolates, then finished with little edible eyes that give every cookie its own goofy monster personality.
The dough uses melted butter and a combination of brown and granulated sugar for chewy centers and lightly crisp edges. There’s no food coloring required, no complicated royal icing, and no need to shape every cookie perfectly. In fact, slightly irregular cookies and unevenly positioned candy eyes make the finished monsters look better.
These are particularly useful for Halloween parties because the dough can be prepared ahead, portioned, and refrigerated until you’re ready to bake. You can also freeze individual dough balls, making it easy to bake a smaller batch whenever you want fresh Halloween cookies.

Easy Halloween Monster Cookies with Candy Eyes
A lot of Halloween cookies rely almost entirely on decoration. Underneath the frosting and candy, the actual cookie can sometimes feel like an afterthought.
We’re doing the opposite here.
The base is a proper brown sugar chocolate chip cookie designed to have soft, chewy centers, lightly caramelized edges, and enough structure to hold the candy pieces and eyes.
The monster appearance happens almost automatically.
Before baking, colorful candy-coated chocolates and chocolate chips are distributed through the dough. A few additional pieces are pressed onto the tops so they remain visible after the cookies spread.
The candy eyes are added immediately after baking, while the cookies are still soft. That allows them to settle into the surface without exposing the sugar decorations to prolonged oven heat.
And there’s an important visual advantage: you don’t need two eyes on every cookie.
Some monsters can have one eye. Some can have two. A few can have three.
That variation makes a tray of monster cookies considerably more fun than twelve identical faces.
⭐ Why You’ll Love This Recipe
👀 Every Cookie Looks Different
Vary the number and position of the candy eyes and each cookie becomes its own little monster.
🍪 Soft and Chewy Centers
Brown sugar, melted butter, and careful baking create a soft center with lightly crisp edges.
🍫 Loaded With Chocolate
Semisweet chocolate chips balance the sweeter candy-coated chocolates.
🎃 No Complicated Decorating
There’s no piping bag, royal icing, or elaborate frosting work.
🧊 Make-Ahead Friendly
The dough can be refrigerated before baking or frozen in individual portions.
👻 Great for Halloween Parties
They’re easy to transport, easy to serve, and don’t require plates or utensils.
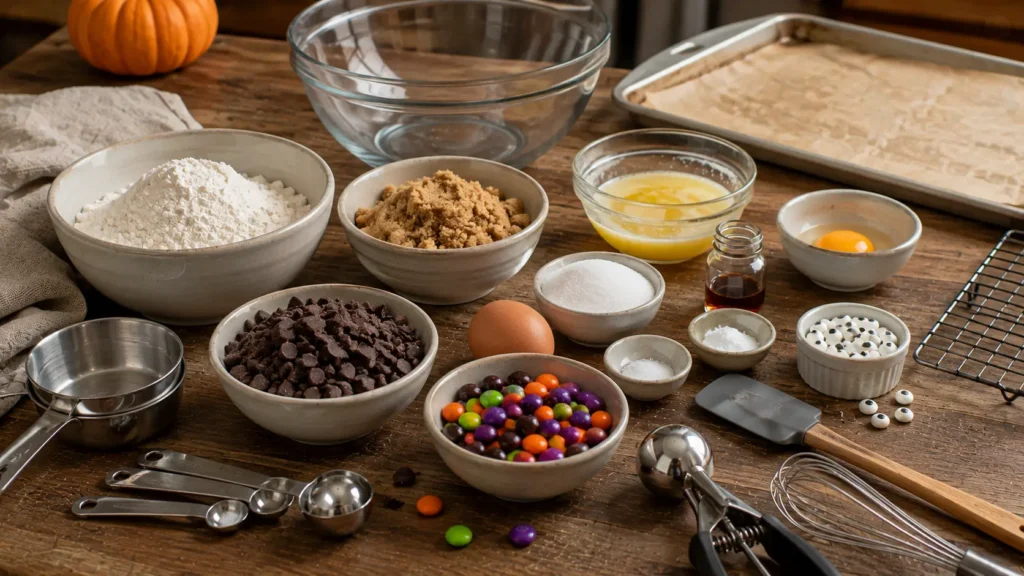
🛒 Ingredients
Unsalted Butter — ¾ Cup (170 g)
We’ll melt the butter rather than cream it.
Melted butter helps create a denser, chewier cookie and makes the dough easy to mix without an electric mixer.
Allow the butter to cool slightly before combining it with the other ingredients.
Light Brown Sugar — ¾ Cup (150 g), Packed
Brown sugar contributes moisture, chewiness, and subtle caramel flavor.
Granulated Sugar — ⅓ Cup (67 g)
A smaller amount of granulated sugar helps the edges spread and become lightly crisp.
Large Egg — 1
Provides structure and moisture.
Egg Yolk — 1
The additional yolk adds richness and tenderness without introducing as much extra liquid as another whole egg.
Vanilla Extract — 2 Teaspoons
Vanilla rounds out the brown sugar and chocolate flavors.
All-Purpose Flour — 2 Cups (250 g)
For the most consistent result, weigh your flour.
If you’re measuring with cups, spoon the flour into the cup and level it rather than scooping directly from the bag.
Baking Soda — ¾ Teaspoon
Provides spread and browning.
Fine Salt — ½ Teaspoon
Balances the sweetness and strengthens the chocolate flavor.
Semisweet Chocolate Chips — ¾ Cup (128 g)
Semisweet chocolate prevents the cookies from becoming overwhelmingly sweet once the candy pieces are added.
Candy-Coated Chocolates — ¾ Cup (about 150 g)
Use Halloween-colored candy-coated chocolates if available.
Orange, purple, green, and dark colors create a recognizable Halloween appearance without requiring food coloring in the dough.
Edible Candy Eyes — Approximately 30–40
Use a mixture of small edible eyes if possible.
You’ll need different amounts depending on whether each monster gets one, two, or three eyes.
👩🍳 How to Make Halloween Monster Cookies
1. Melt the Butter
Melt the unsalted butter gently.
Transfer it to a large mixing bowl and allow it to cool for approximately 10 minutes.
It can remain warm, but it shouldn’t be piping hot.
2. Combine the Sugars
Add the brown sugar and granulated sugar to the melted butter.
Whisk thoroughly until evenly combined.
The mixture will look glossy and slightly grainy.
3. Add the Egg and Egg Yolk
Whisk in the whole egg and additional egg yolk.
Continue whisking until the mixture becomes smoother and slightly thicker.
4. Add Vanilla
Whisk in the vanilla extract.
5. Combine the Dry Ingredients
In a separate bowl, whisk together:
- all-purpose flour
- baking soda
- fine salt
Mix thoroughly so the baking soda is evenly distributed.
6. Combine Wet and Dry Ingredients
Add the dry ingredients to the wet mixture.
Switch to a silicone spatula and fold gently.
Stop when only a few flour streaks remain.
7. Add the Chocolate
Fold in:
- ¾ cup semisweet chocolate chips
- about ½ cup candy-coated chocolates
Reserve the remaining candy pieces for the tops.
Mix only until evenly distributed.
8. Chill the Dough
Cover the bowl and refrigerate the dough for approximately 30–45 minutes.
This is worth doing.
Because the recipe uses melted butter, chilling helps prevent excessive spreading and gives the flour time to hydrate.
9. Preheat the Oven
Toward the end of the chilling period, preheat your oven to 350°F (175°C).
Line two large baking sheets with parchment paper.
10. Portion the Cookies
Scoop approximately 2 tablespoons of dough per cookie, about 40–45 grams each.
Roll very gently into rough balls.
Don’t compress them heavily.
11. Add Extra Candy
Press several reserved candy-coated chocolates and one or two chocolate chips into the top of each dough ball.
This ensures that some colorful pieces remain clearly visible after baking.
Don’t add the candy eyes yet.
They’ll be added after the cookies come out of the oven.
12. Space Them Apart
Arrange approximately six dough portions on each baking sheet.
Leave at least 2–3 inches between them.

13. Bake
Bake for approximately 10–12 minutes.
The cookies are ready when:
- edges look set
- edges have developed slight golden color
- centers still look soft
- the surface no longer appears completely raw
Don’t wait for the centers to become firm in the oven.
14. Add the Candy Eyes
As soon as the baking sheet comes out of the oven, gently press candy eyes into the soft surface.
Create different monsters:
- one eye
- two eyes
- three eyes
Vary their positions slightly.
Don’t press so hard that the eyes disappear into the cookie.
15. Reshape if Necessary
If a cookie has spread unevenly, use the rounded edge of a large cookie cutter or glass to gently nudge it into a rounder shape while it’s still hot.
Don’t make them perfectly circular.
A little irregularity suits monster cookies.
16. Cool on the Baking Sheet
Allow the cookies to cool on the baking sheet for approximately 5–7 minutes.
They’ll continue setting during this time.
17. Transfer to a Cooling Rack
Carefully move the cookies to a wire rack.
Allow them to cool completely—or eat one while it’s still slightly warm and the chocolate is soft.
🍽️ Equipment
You’ll need:
- Large mixing bowl
- Medium mixing bowl
- Whisk
- Silicone spatula
- Measuring cups and spoons
- Kitchen scale, recommended
- Cookie scoop
- Two large baking sheets
- Parchment paper
- Wire cooling rack
- Small saucepan or microwave-safe bowl for melting butter
- Airtight container for storage
No stand mixer or hand mixer is necessary.
🔁 Variations
🎃 Orange and Black Monster Cookies
Use only orange and dark-colored candy-coated chocolates for a stronger Halloween color palette.
👁️ One-Eyed Monster Cookies
Put one larger candy eye in the center of every cookie for a cyclops theme.
👾 Three-Eyed Monsters
Use three small candy eyes arranged irregularly across the top.
These look especially good mixed into a platter with the one- and two-eyed cookies.
🍫 Double Chocolate Monster Cookies
Replace ¼ cup (30 g) flour with ¼ cup (22 g) unsweetened cocoa powder.
Watch the baking time carefully because dark chocolate dough makes visual doneness harder to judge.
🥜 Peanut Butter Monster Cookies
Replace a small portion of the butter with creamy peanut butter for a nutty variation.
If you’re serving these at a school or large party, clearly identify them as containing peanuts.
🍬 Candy-Bar Monster Cookies
Replace some of the chocolate chips with small pieces of your favorite chocolate candy.
Keep the pieces relatively small so the cookies maintain their structure.
💡 Pro Tips
Weigh the Flour
Too much flour can make cookies thick, dry, and reluctant to spread.
For this recipe, 250 grams gives you much more consistency than an aggressively packed measuring cup.
Cool the Melted Butter
Very hot butter can make the dough overly loose and affect the egg mixture.
Give it several minutes before continuing.
Don’t Skip the Chill
Because we’re using melted butter, a short chill helps control spreading.
Reserve Some Candy
If every candy piece goes inside the dough, your finished cookies may look surprisingly plain.
Pressing a few pieces onto the surface before baking keeps the Halloween colors visible.
Add Eyes After Baking
Candy eyes can discolor or crack under prolonged oven heat.
Pressing them into the hot cookies afterward gives you much more predictable results.
Underbake Slightly
The centers should still look soft when the cookies leave the oven.
Residual heat will finish setting them.
Make the Monsters Different
Don’t put two eyes in exactly the same place on every cookie.
The irregular faces are part of what makes these fun.
🧊 Storage & Freezing
Room Temperature
Store completely cooled cookies in an airtight container for up to 4 days.
A piece of parchment between layers helps protect the candy eyes.
Refrigerator
Refrigeration isn’t necessary unless your kitchen is unusually warm.
It can also make cookies firmer, so room-temperature storage is generally preferable.
Freezing Baked Cookies
Place completely cooled cookies in a freezer-safe container with parchment between layers.
Freeze for up to 2 months.
Allow them to thaw at room temperature.
Freezing Cookie Dough
This is my preferred make-ahead option.
Portion the dough into individual balls and freeze them on a parchment-lined tray until solid.
Transfer the frozen portions to a freezer bag or airtight container.
Freeze for up to 2 months.
When you’re ready to bake, let the dough portions sit at room temperature while the oven preheats, then bake from chilled or partially frozen, adding a minute or two if necessary.
Press fresh candy eyes into the cookies after baking.
❓ Frequently Asked Questions
Can I Add the Candy Eyes Before Baking?
I recommend adding them afterward.
Some edible eyes can discolor, crack, or partially melt in the oven.
The freshly baked cookies are soft enough to hold the eyes securely.
Why Did My Cookies Spread Too Much?
Common causes include:
- butter was too hot
- dough wasn’t chilled
- flour was undermeasured
- baking sheet was warm before dough was added
Chill the dough for at least 30 minutes and start with a cool baking sheet.
Why Didn’t My Cookies Spread?
Too much flour is a common reason.
Weighing the flour is the easiest way to prevent this.
Very cold dough may also need a few extra minutes at room temperature before baking.
Can I Make the Dough the Day Before?
Yes.
Cover and refrigerate overnight.
Because the dough will become considerably firmer, let it sit at room temperature for approximately 10–15 minutes if it’s too hard to scoop.
Can I Use Different Candy?
Absolutely.
Just keep the pieces reasonably small and remember that candies containing caramel or other fillings can behave differently in the oven.
How Do I Keep the Cookies Soft?
Don’t overbake them.
The centers should still look slightly underdone when they leave the oven.
Store the cooled cookies in an airtight container.
Can Kids Decorate These?
Yes.
Once an adult handles the oven and hot baking sheets, children can choose how many eyes each cooled or slightly warm cookie gets.
🍽️ What to Serve With Halloween Monster Cookies
These cookies work well as part of a mixed Halloween dessert table because they’re easy to grab and don’t require utensils.
Pair them with Spooky Mummy Brownies with Candy Eyes for another chocolate-heavy option, or serve them alongside Halloween Graveyard Dirt Cups when you want both handheld cookies and creamy individual desserts.
For the savory side of the party, Jalapeño Popper Mummies with Crescent Rolls add heat and creaminess, while Easy Mummy Pretzel Dogs are an approachable option for guests who prefer something milder.
A Halloween table doesn’t need every recipe to feature candy eyes or spooky decorations. Mixing a few themed dishes with simpler snacks usually looks better and gives guests more variety.
📊 Approximate Nutrition
Based on 18 cookies:
Calories: ~255
Carbohydrates: ~35 g
Protein: ~3 g
Fat: ~12 g
Saturated Fat: ~7 g
Fiber: ~1 g
Sugar: ~23 g
Sodium: ~125 mg
Nutrition is an estimate and varies depending on the specific chocolate chips, candy-coated chocolates, candy eyes, and portion sizes used.

Spooky Halloween Monster Cookies with Candy Eyes
Ingredients
Method
- Melt the butter and allow it to cool for approximately 10 minutes.
- Whisk melted butter, brown sugar, and granulated sugar until combined.
- Add the whole egg and egg yolk and whisk until smooth.
- Mix in vanilla.
- In a separate bowl, whisk flour, baking soda, and salt.
- Fold the dry mixture into the wet ingredients until nearly combined.
- Fold in the chocolate chips and about ½ cup candy-coated chocolates.
- Cover and refrigerate the dough for 30–45 minutes.
- Preheat oven to 350°F (175°C) and line baking sheets with parchment.
- Portion approximately 2 tablespoons or 40–45 g of dough per cookie.
- Press reserved candy-coated chocolates and a few chocolate chips onto each dough ball.
- Arrange cookies 2–3 inches apart.
- Bake for 10–12 minutes, until the edges are set but centers remain soft.
- Immediately press one, two, or three candy eyes into each warm cookie.
- Cool on the baking sheet for 5–7 minutes.
- Transfer to a wire rack to finish cooling.
Notes
- Weigh flour when possible for more consistent cookies.
- Allow melted butter to cool before adding eggs.
- Don’t skip the 30-minute dough chill.
- Reserve some candy pieces for the tops.
- Add edible candy eyes after baking.
- Don’t overbake; the centers should remain soft when removed from the oven.
- Make each monster slightly different by varying the number and position of its eyes.
- Dough portions can be frozen for up to 2 months.
- Store baked cookies in an airtight container at room temperature for up to 4 days.